A comprehensive daily pre-trip inspection is the cornerstone of effective truck fleet management. By diligently examining every component of a truck before each journey, fleet owners can significantly reduce the risk of breakdowns, accidents, and costly repairs. This article will delve into the essential elements of a daily pre-trip inspection checklist and explain how it contributes to overall fleet efficiency and safety.
Table of Contents
ToggleWhat is a Pre-Trip Inspection?

A pre-trip inspection is a mandatory examination of a vehicle conducted daily before operation to verify its roadworthiness. Drivers use a checklist to systematically identify potential issues with the truck, such as mechanical problems, tire wear, or lighting failures. By catching problems early, pre-trip inspections help prevent breakdowns, accidents, and delays.
Failing to perform a pre-trip inspection can have serious consequences. Not only does it endanger the driver and other road users, but it can also lead to legal penalties, damage to a company’s reputation, and increased operating costs due to unexpected repairs.
Why are Pre-Trip Inspections Important?
Pre-trip inspections are crucial to maintaining vehicle safety and fleet efficiency. By systematically checking a vehicle before each trip, drivers and fleet managers can identify potential problems early on and prevent costly breakdowns and accidents.
Improved Safety
Regular pre-trip inspections significantly reduce the risk of accidents. By carefully examining vehicle components such as tires, brakes, lights, and steering, drivers can identify and address potential hazards before they become serious issues. This proactive approach helps protect both drivers and other road users.
Legal Compliance
Many jurisdictions require commercial drivers to conduct pre-trip inspections and maintain detailed records. Failing to comply with these regulations can result in hefty fines and penalties. By consistently performing and documenting pre-trip inspections, fleets can avoid legal trouble and maintain a strong reputation.
Increased Vehicle Lifespan
Early detection of minor issues through pre-trip inspections helps prevent them from escalating into major problems. Addressing small problems promptly can extend the overall lifespan of a vehicle, reducing the need for costly repairs and replacements. This ultimately leads to lower maintenance costs and better vehicle performance.
Cost Savings
Preventing breakdowns through pre-trip inspections helps avoid costly roadside repairs, towing fees, and lost productivity. Additionally, well-maintained vehicles tend to consume less fuel and require fewer repairs, resulting in overall fleet cost savings.
Enhanced Fleet Efficiency
Pre-trip inspections help maintain fleet uptime and productivity by identifying and addressing vehicle problems before they cause breakdowns. This means fewer delays, improved delivery schedules, and better customer satisfaction.
Pre-Trip Inspection Requirements

Before operating a commercial vehicle, drivers must conduct a thorough pre-trip inspection to ensure the vehicle is safe for the road. Transportation regulations mandate this inspection and includes several key components:
1. Vehicle Condition Assessment
The primary goal of a pre-trip inspection is to verify that the vehicle is in safe operating condition. This involves carefully examining various components, such as tires, brakes, lights, steering, and engine systems. Drivers must ensure that all safety equipment, including emergency exits, fire extinguishers, and first aid kits, is present and in good working order.
2. Inspection Report Review
If a previous inspection report exists for the vehicle, drivers must review it to identify any reported issues. This review helps determine if necessary repairs have been completed and if any ongoing concerns require attention.
3. Driver Certification
After completing the inspection, drivers must sign and date the inspection report. This signature confirms that they have conducted a thorough examination and believe the vehicle is safe to operate. If any issues are found during the inspection, the driver must document them on the report and certify that the vehicle will not be operated until the problems are corrected.
4. Driver Vehicle Inspection Report (DVIR)
If a driver discovers any vehicle defects or deficiencies during the inspection, they must complete a Driver Vehicle Inspection Report (DVIR). This report details the specific problems found, including their location and severity. The DVIR also includes information about the vehicle, driver, and carrier. The vehicle must be taken out of service until the identified issues are repaired.
By following these requirements and completing thorough pre-trip inspections, drivers can help prevent accidents, reduce breakdowns, and ensure compliance with transportation regulations.
What is a Daily Pre-Trip Inspection Checklist?
A daily pre-trip inspection checklist is designed to help monitor trucks effectively by providing detailed information about the vehicle’s daily condition before each journey. This information eliminates potential risks and disruptions to fleet operation. In addition, it makes it easy to track maintenance schedules, detect problems early, and ensure compliance with safety regulations.
What to Check During a Pre-Trip Inspection?
The specific items included in a pre-trip inspection can vary based on local regulations and the type of vehicle. However, a thorough inspection typically covers key areas. With that said, here are some of the areas that you should cover during a pre-trip inspection.
1. Vehicle Exterior
- Tires: Check for proper inflation, tread wear, damage, and foreign objects.
- Wheels and Rims: Inspect for cracks, damage and secure lug nuts.
- Lights and Reflectors: Ensure all lights, including headlights, taillights, brake lights, turn signals, and emergency flashers, are working correctly.
- Windshield and Wipers: Verify windshield clarity and wiper function.
- Mirrors: Check for proper alignment, cleanliness, and absence of cracks.
- Body: Inspect for dents, scratches, or any signs of structural damage.
2. Vehicle Interior
- Seat Belts: Verify proper function and condition.
- Horn: Test for clarity and functionality.
- Emergency Equipment: Check the availability and condition of the fire extinguisher, first aid kit, warning devices, and other required items.
- Driver’s Seat: Adjust for comfort and visibility.
- Controls: Ensure proper operation of the steering wheel, brakes, accelerator, and other controls.
3. Under the Hood
- Engine Oil: Check level and condition.
- Coolant: Verify level and condition.
- Brake Fluid: Inspect the level and check for signs of leaks.
- Power Steering Fluid: Check level and condition.
- Battery: Assess condition, terminals, and secure mounting.
- Belts and Hoses: Look for signs of wear, cracks, or leaks.
- Air Filters: Inspect for dirt and debris.
4. Additional Checks
- Fuel Level: Ensure sufficient fuel for the planned trip.
- Cargo Securement: Verify proper loading and securing of cargo (if applicable).
- Coupling System (for trailers): Inspect for damage, wear, and proper connection (if applicable).
Note: The content above is also the same as what you should include in your daily pre-trip inspection checklist. By consistently performing thorough pre-trip inspections, you can significantly improve vehicle safety, reduce breakdowns, and extend the life of your vehicle.
Benefits of Using a Digital Pre-Trip Inspection Checklist
Fleet managers often struggle to keep track of daily pre-trip inspections and ensure that vehicles comply with safety regulations. A digital pre-trip inspection checklist can help with the following:
Improve Fleet Safety and Compliance
A digital pre-trip inspection checklist can help fleet managers stay current on vehicle safety standards and quickly identify and address potential issues. Pre-trip inspections provide a comprehensive overview of vehicle safety and help ensure compliance.
Reduce Vulnerability To Accidents
By using a digital pre-trip inspection checklist, fleet managers can quickly identify and address any safety issues before they become a problem. This helps reduce the chances of an accident or disruption to fleet operations.
Save Time and Money
A digital pre-trip inspection checklist helps streamline the pre-trip inspection process and save time, which can ultimately result in cost savings. This improved workflow also eliminates the need for manual paperwork and reduces the risk of human error.
Ensure Quality Control
Using a digital pre-trip inspection checklist helps fleet managers keep track of all pre-trip inspections and quickly address any quality issues. This provides an easy way to identify problems and ensure that all pre-trip inspections are completed accurately and in a timely manner.
How to Create a Daily Pre-Trip Inspection Checklist using DataMyte Digital Clipboard
STEP 1 – Log in to Digital Clipboard Account
- Access your Digital Clipboard account using your login credentials.
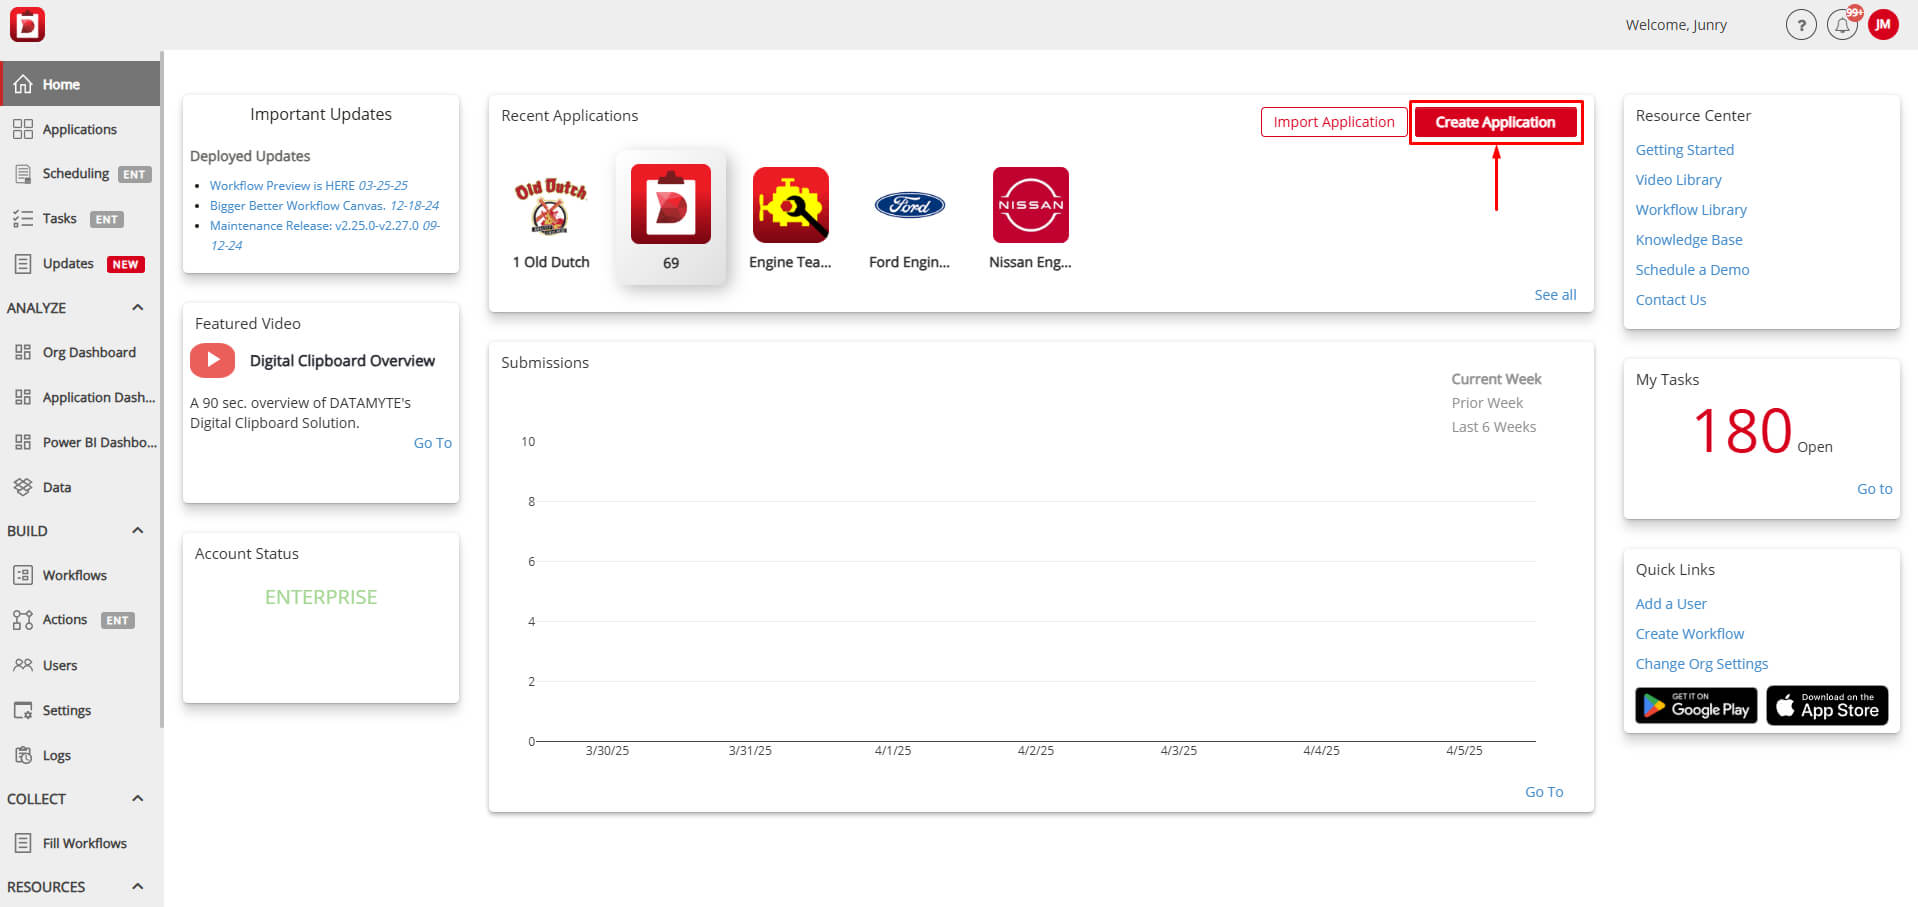
- Navigate to the dashboard for an overview of your existing applications.

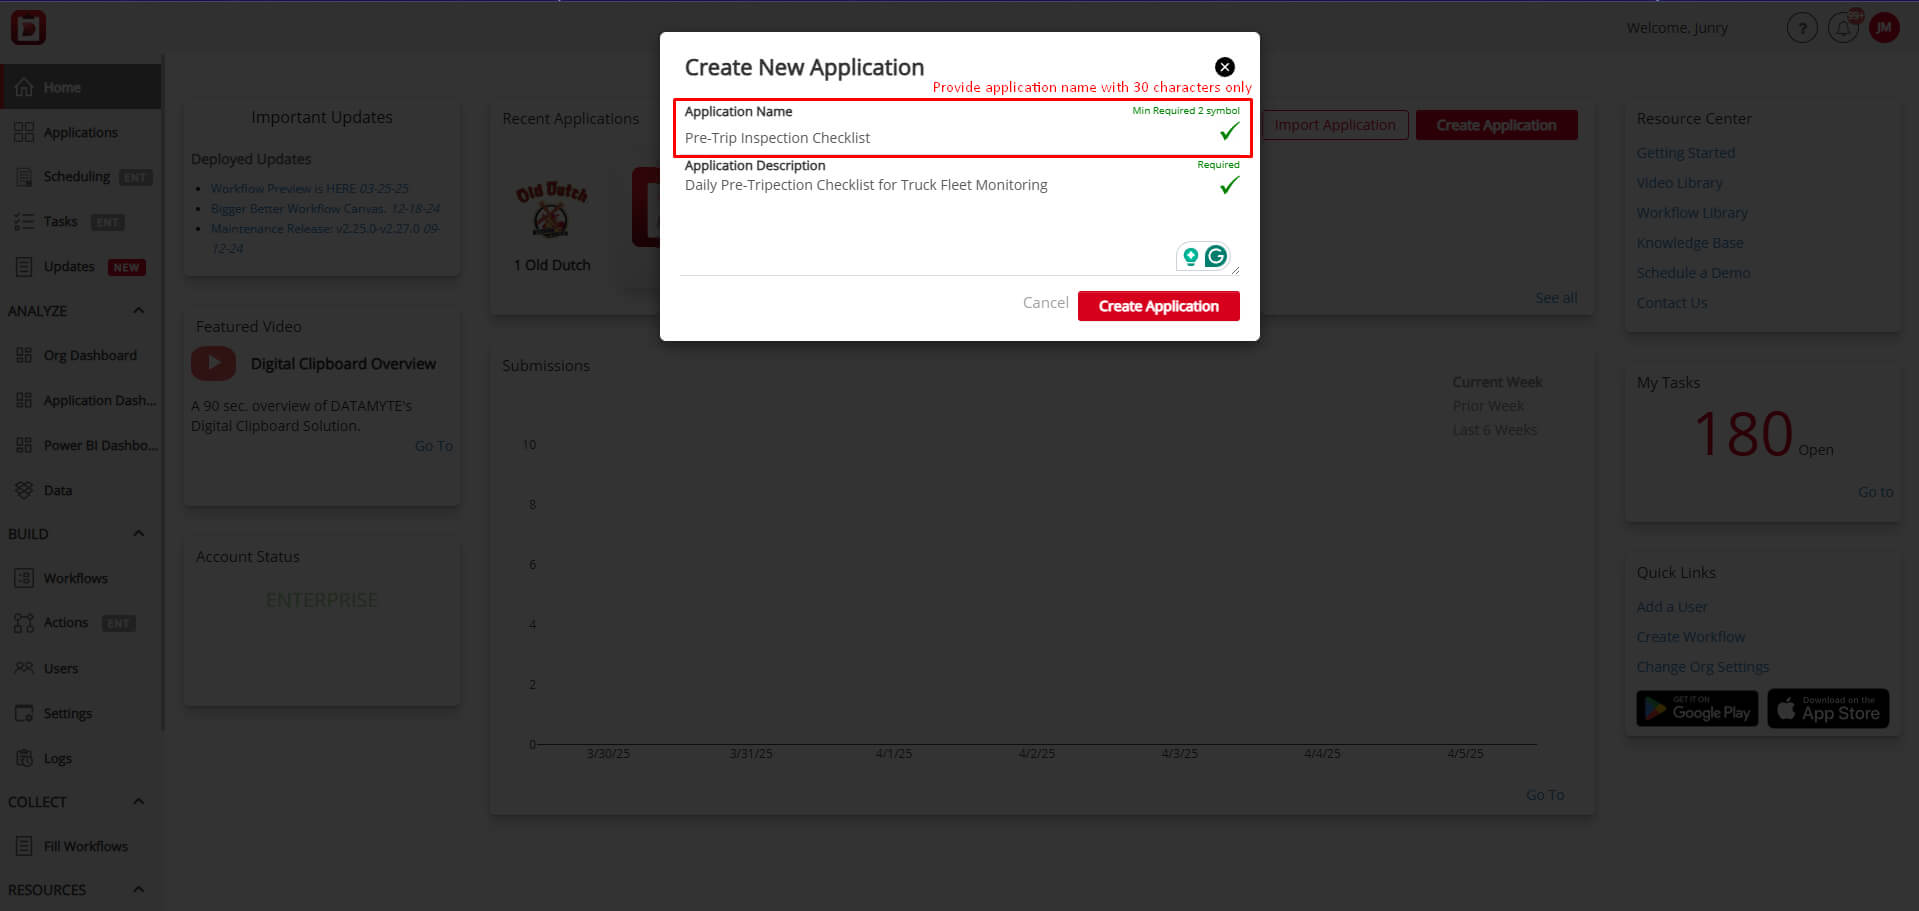
STEP 2 – Create Application
- Click on the Create Application button.
- Provide a suitable Application Name and Description that reflect its purpose.
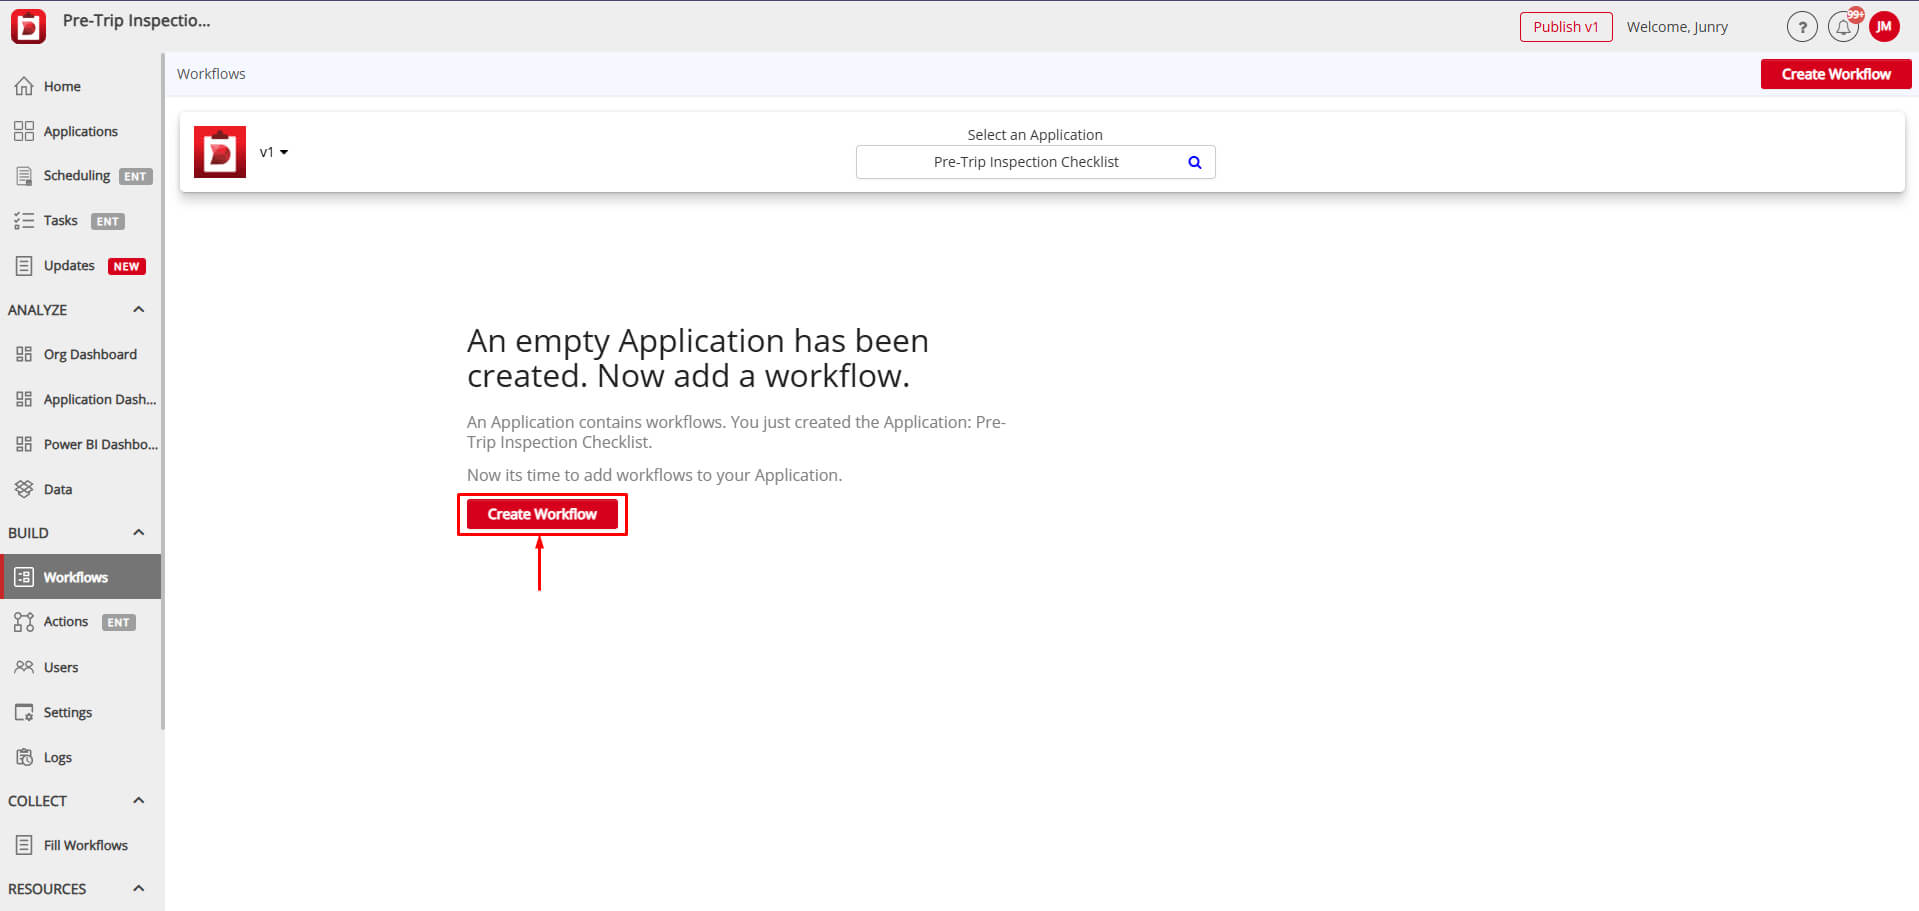
STEP 3 – Create Workflow
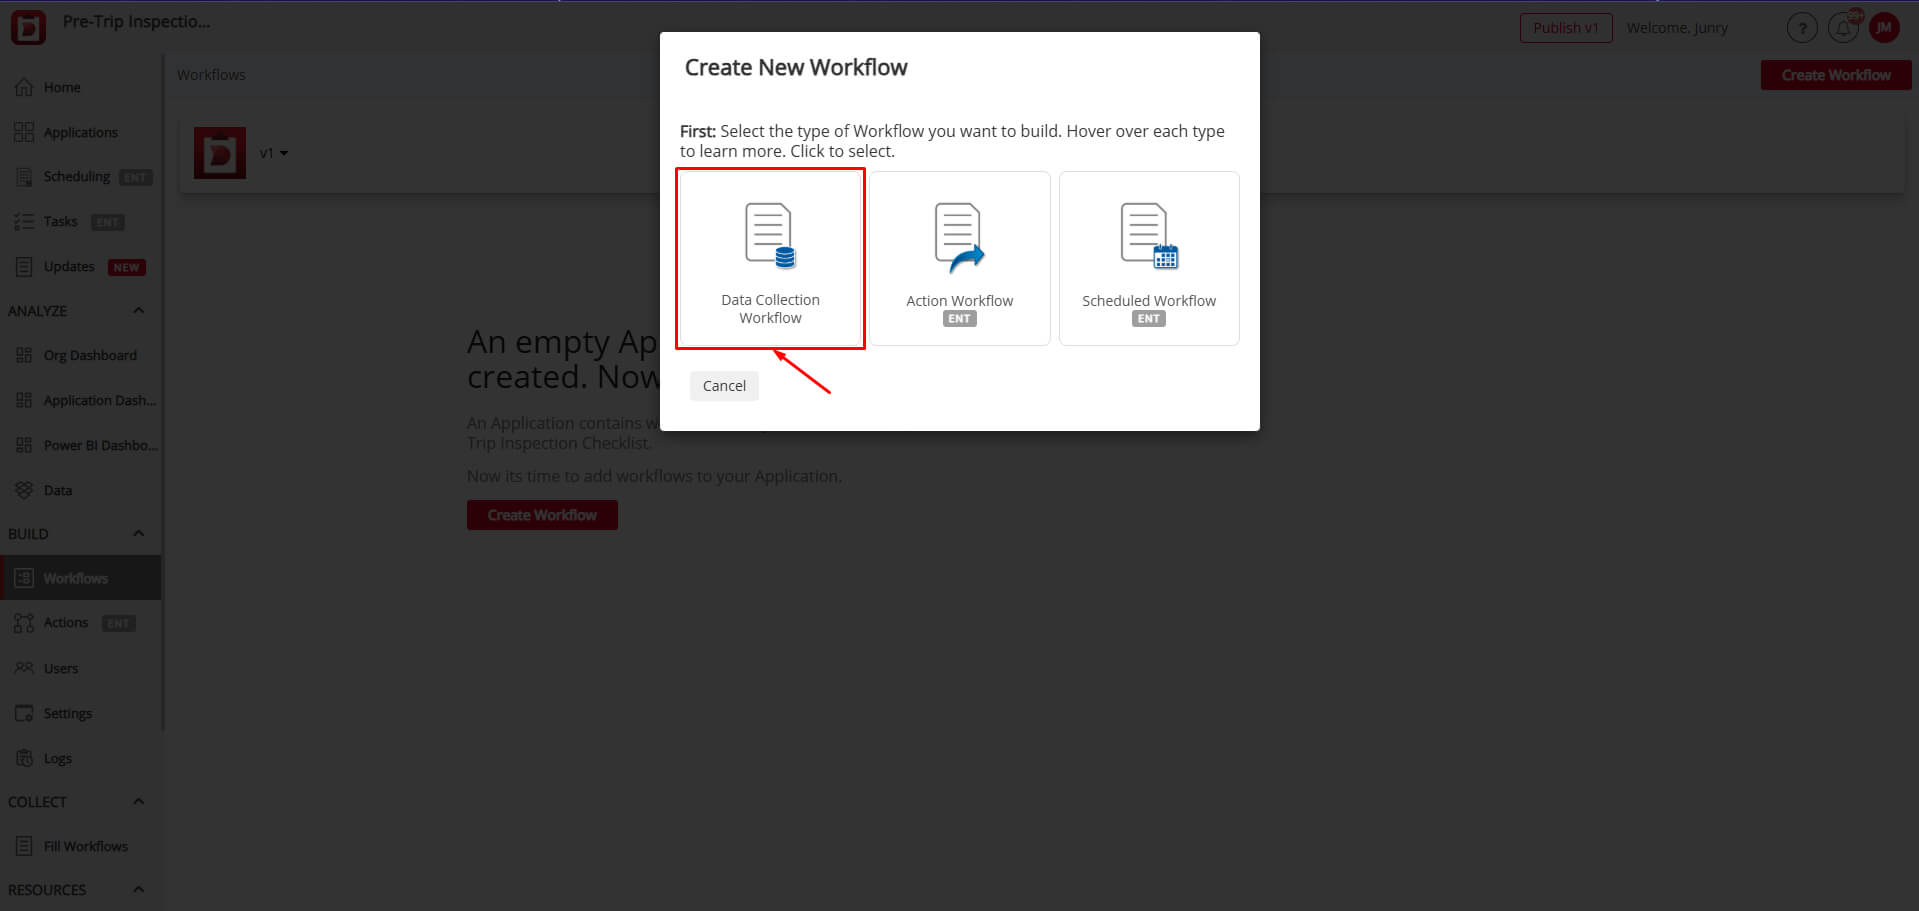
- Navigate to the Workflows tab and select Create New Workflow.
- Choose Data Collection Workflow as the workflow type.
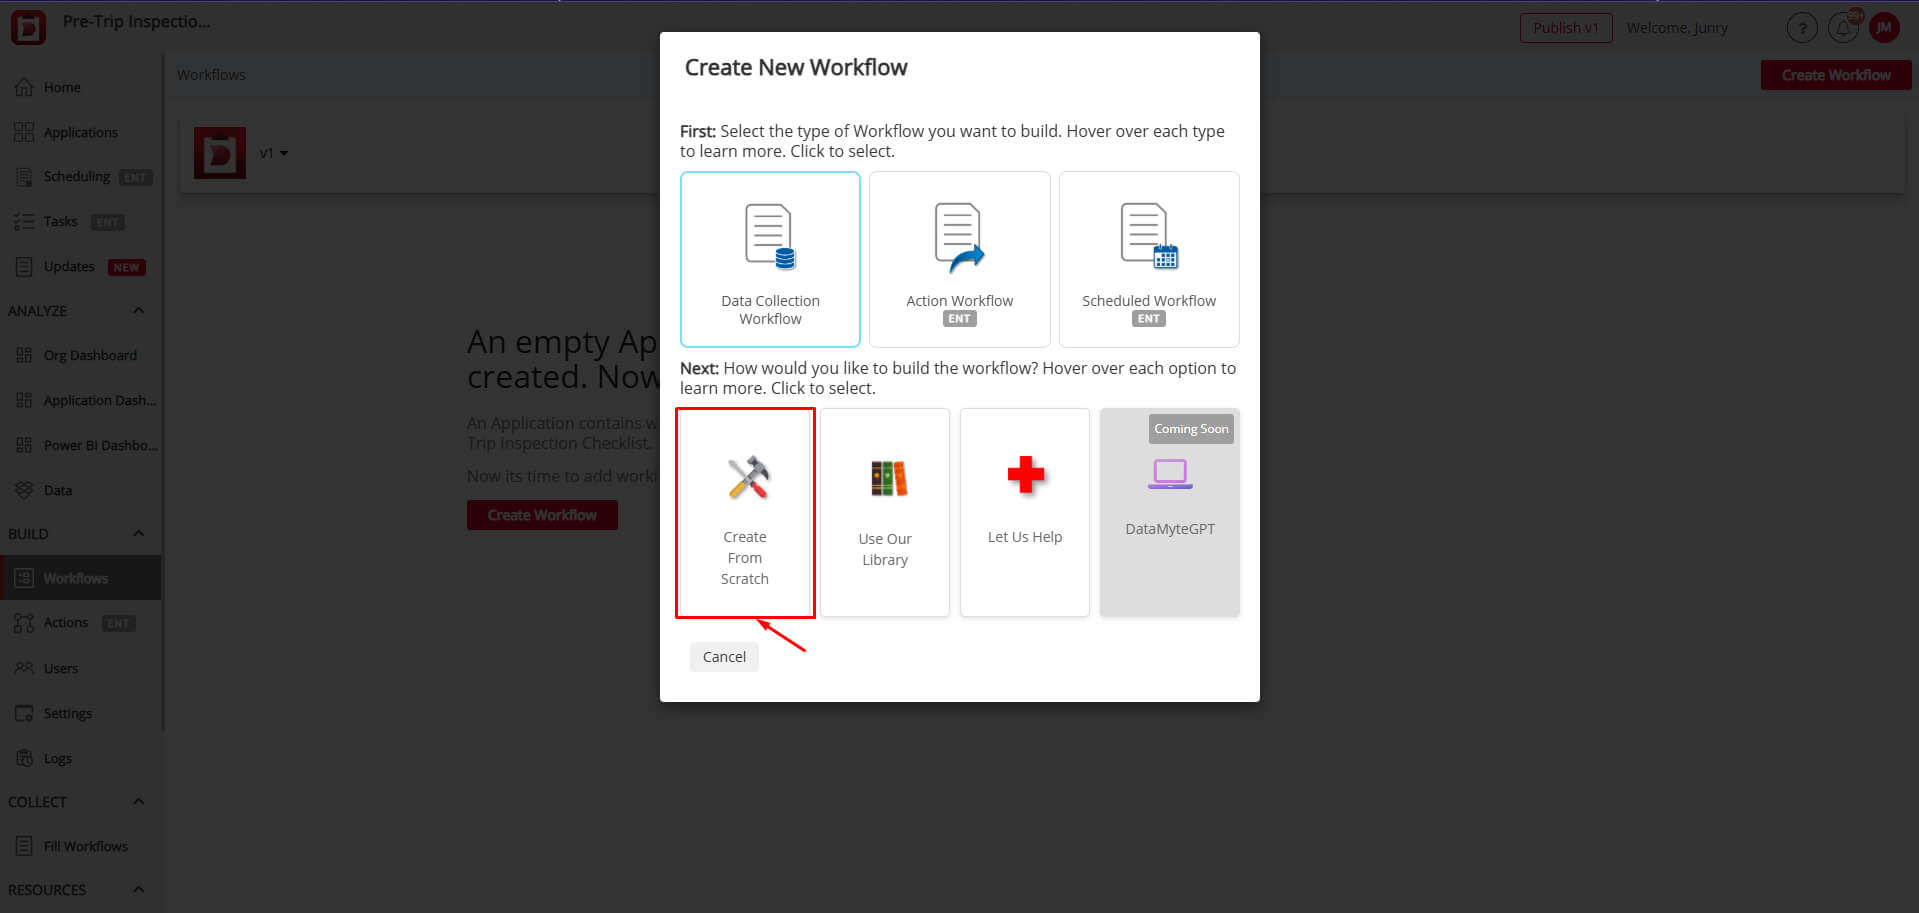
- Select Create From Scratch for a customized design.
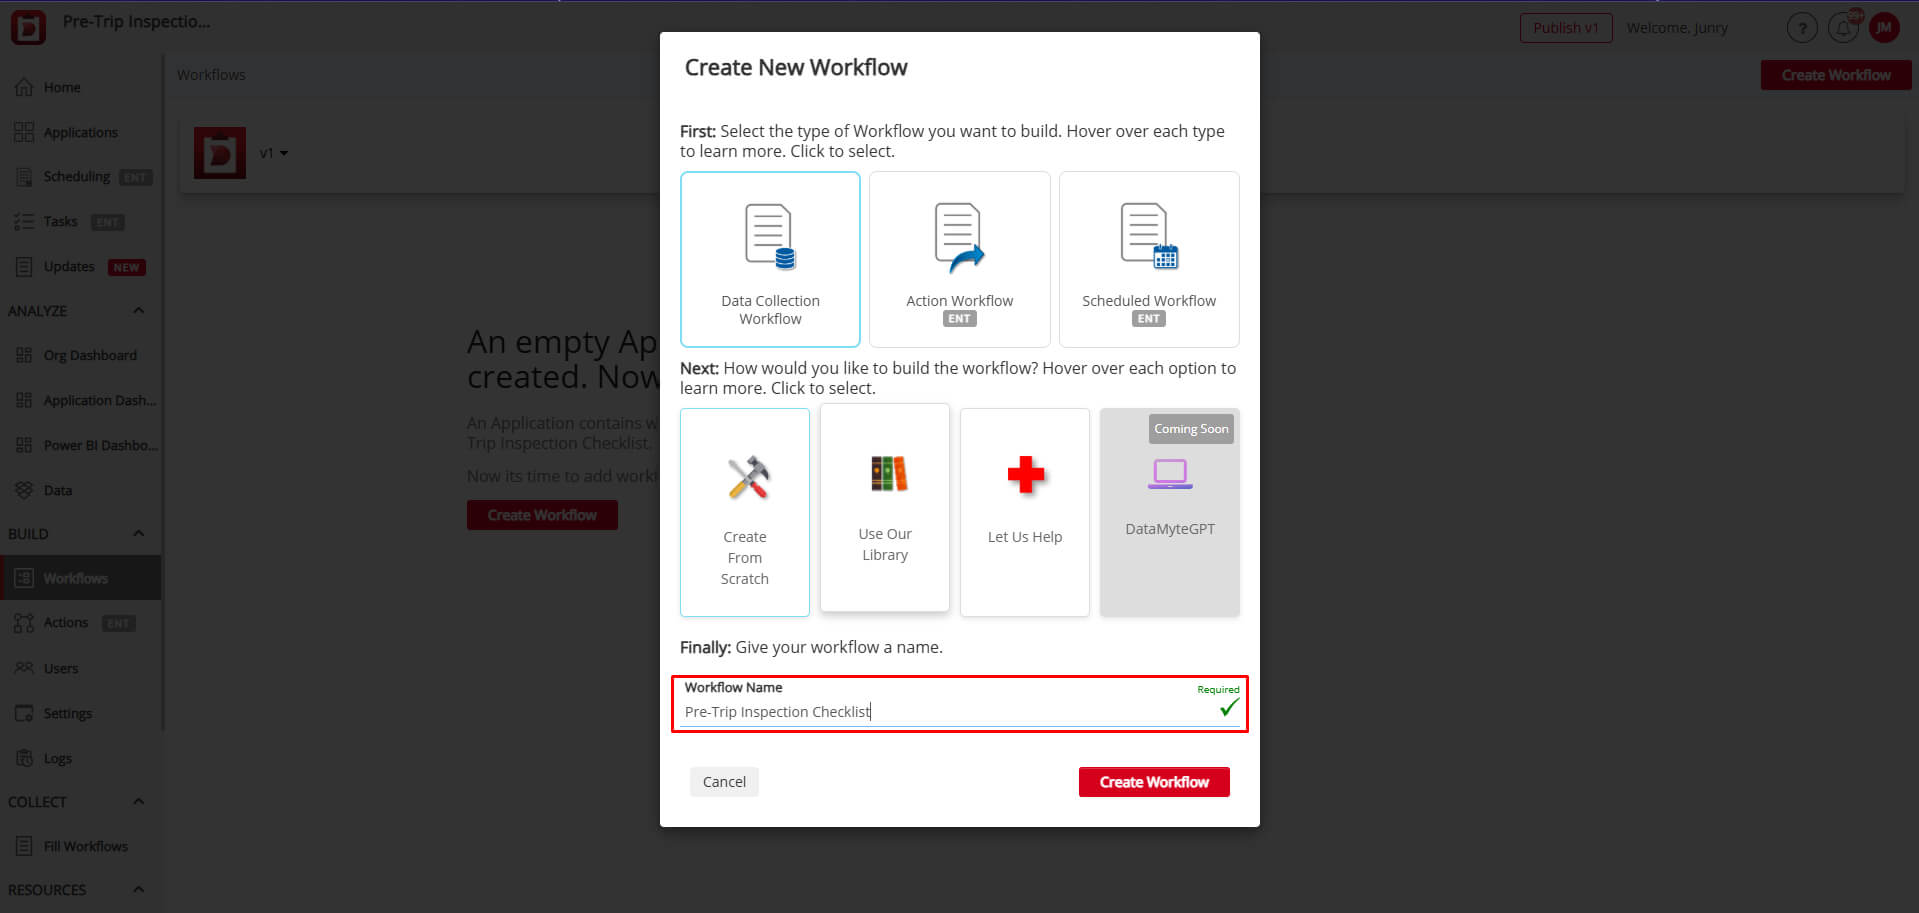
- Enter a descriptive Workflow Name.
STEP 4 – Start Workflow Creation with Provided Checklist
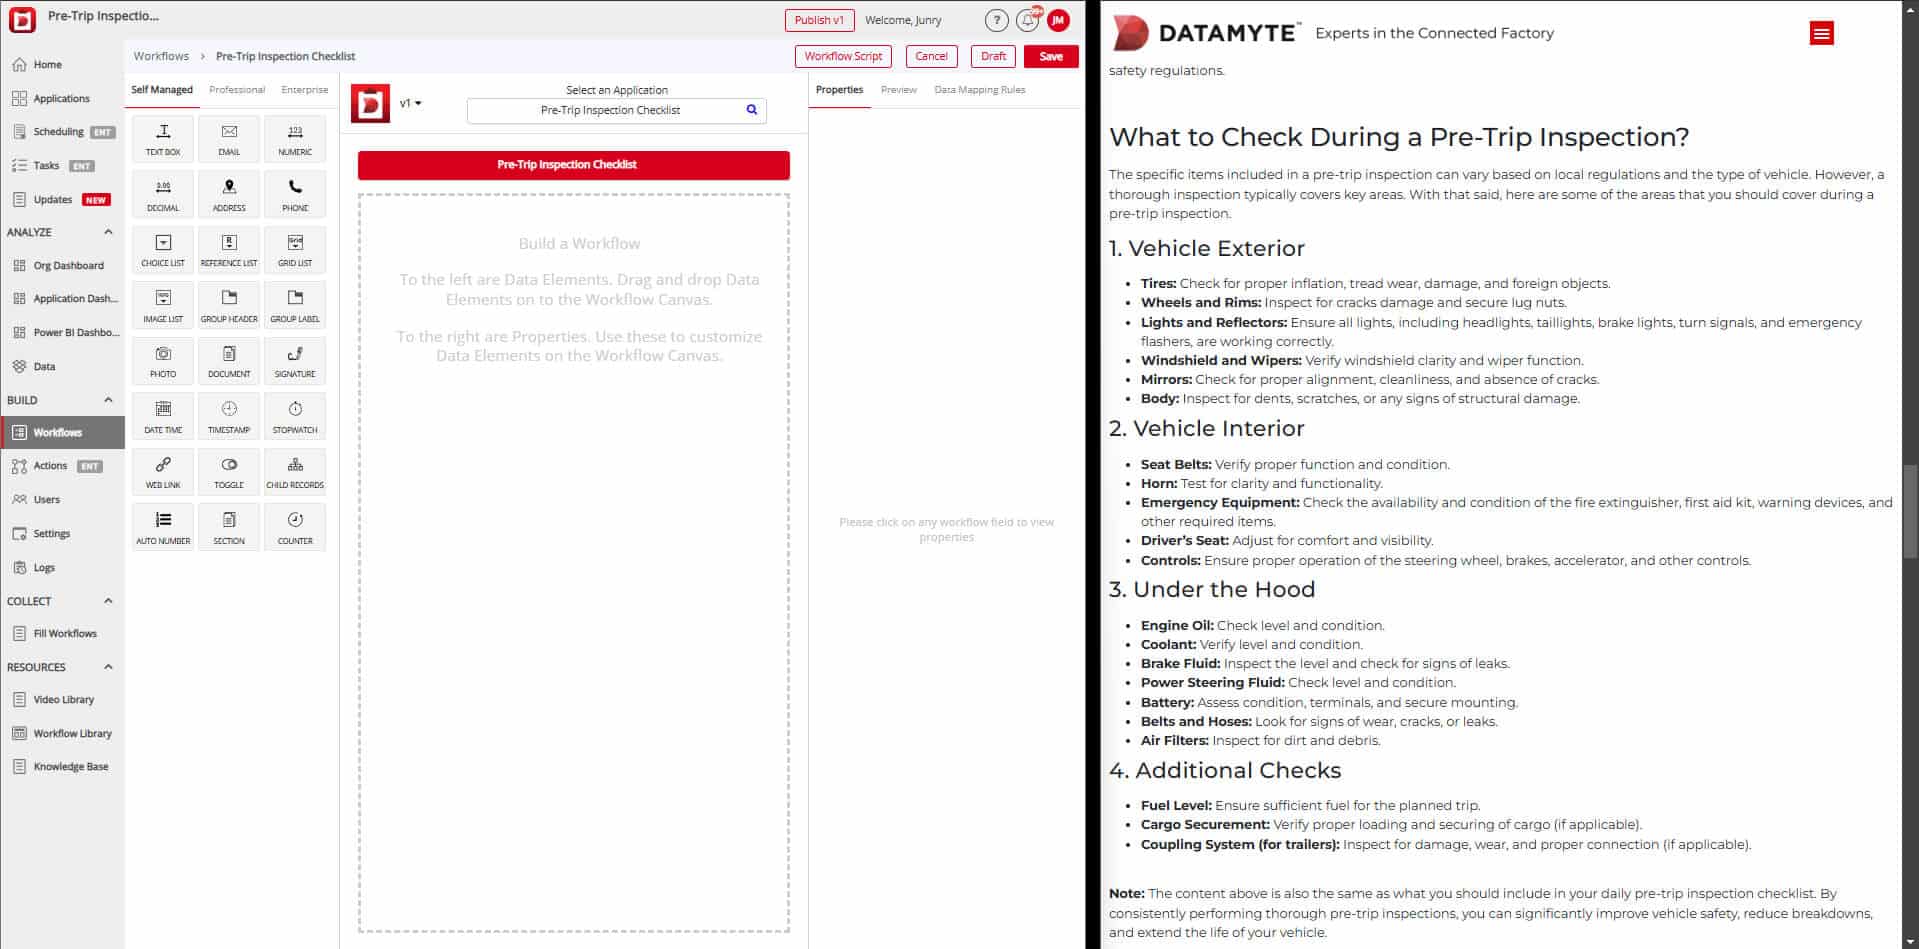
- Follow the provided checklist to ensure a complete and accurate workflow design.
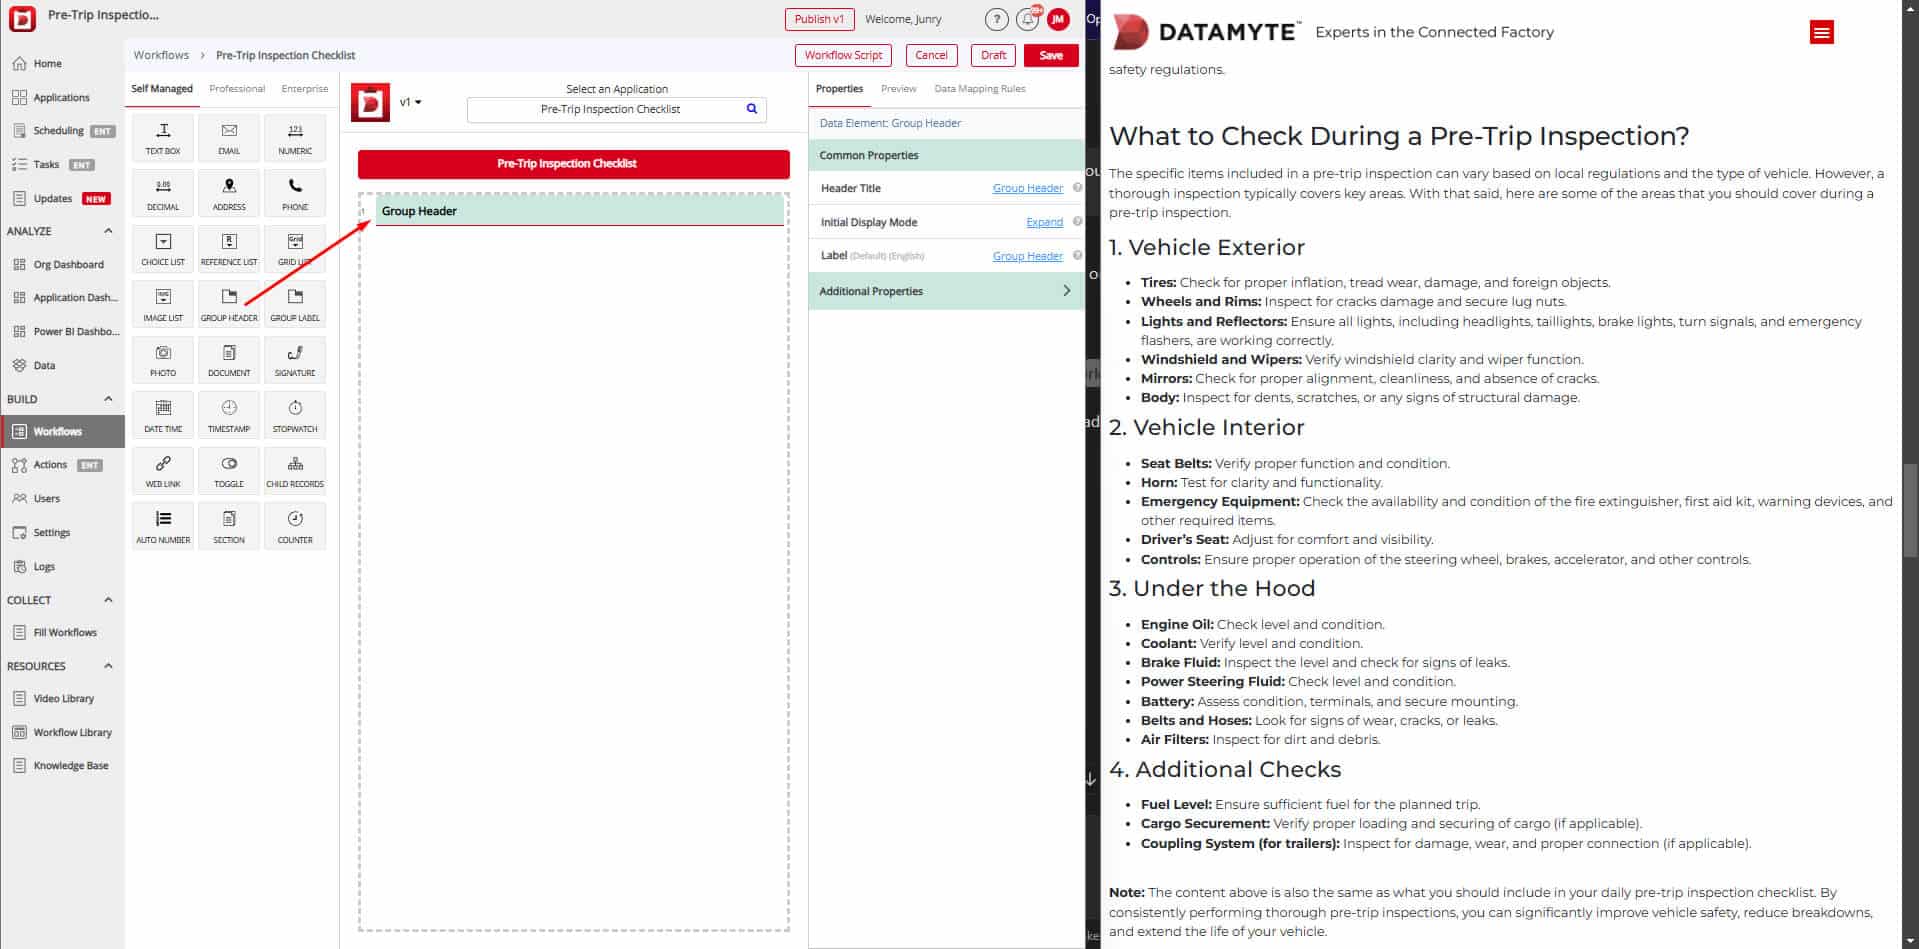
STEP 5 – Add Group Header Data Elements
- Drag and drop Group Header Data Elements onto the workflow canvas.
- Adjust its size and positioning as needed.
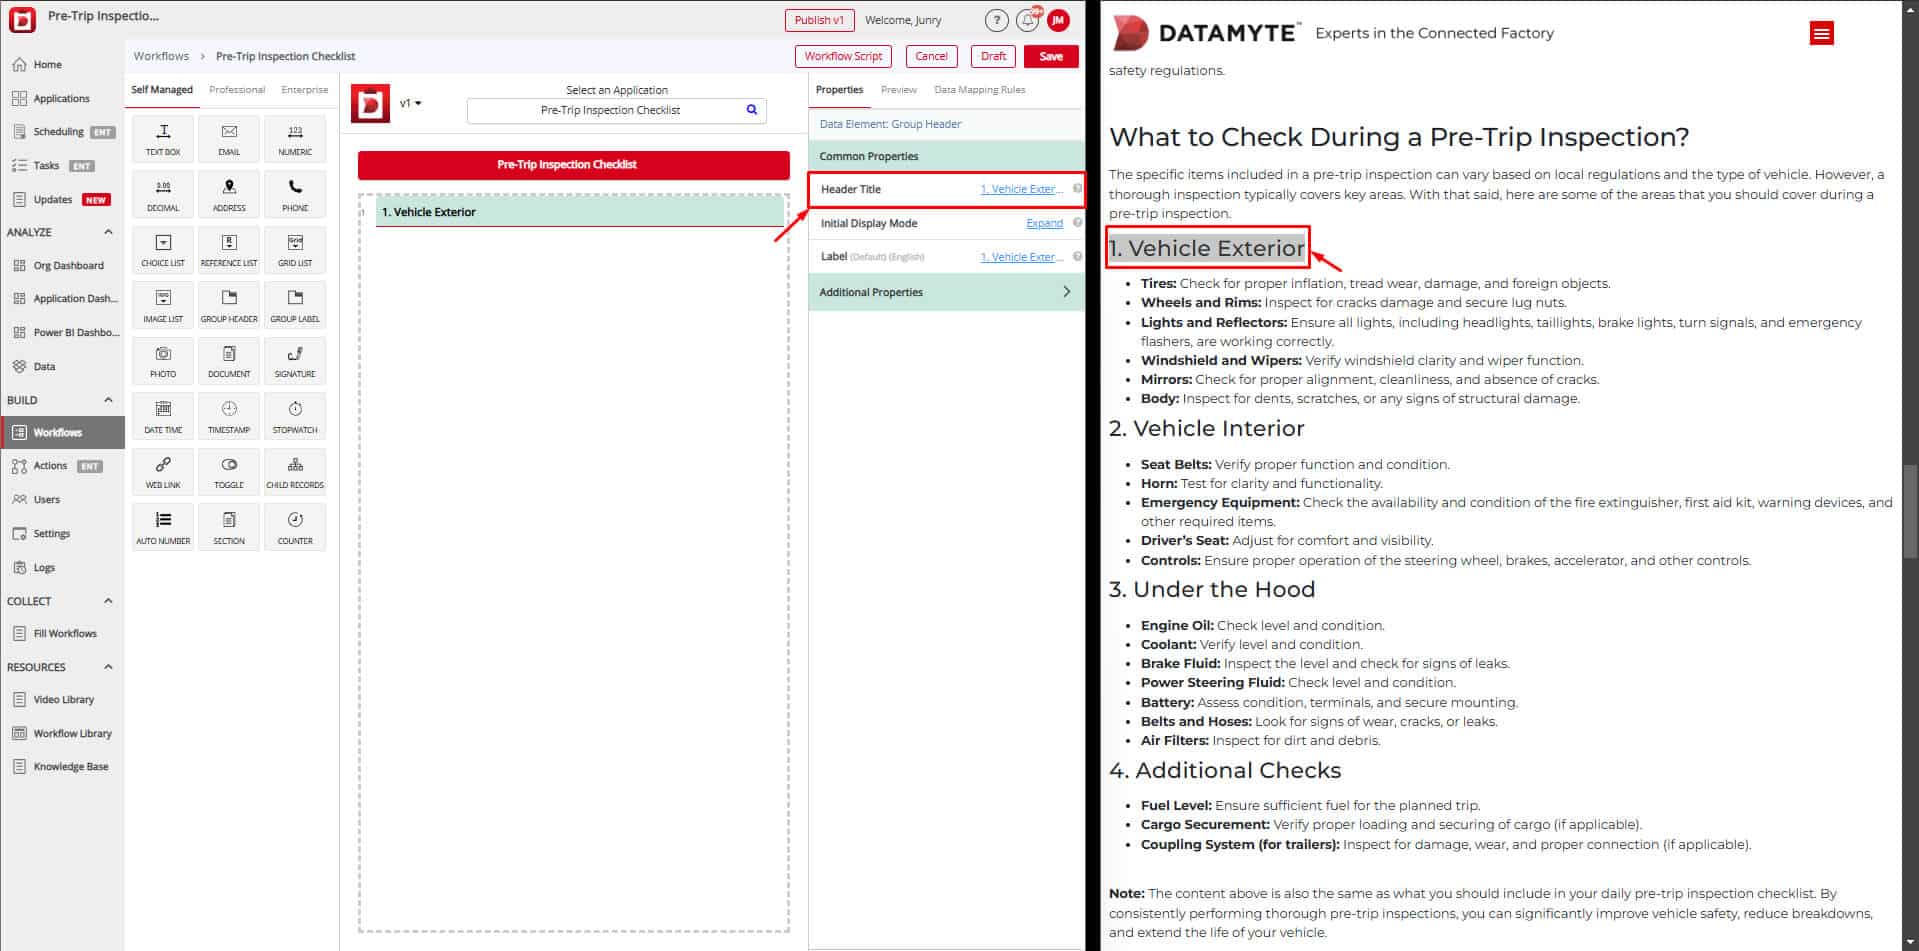
STEP 5.1 – Update Group Header Title
- Select the Group Header and navigate to Common Properties.
- Update the Title field using the information from the provided checklist.
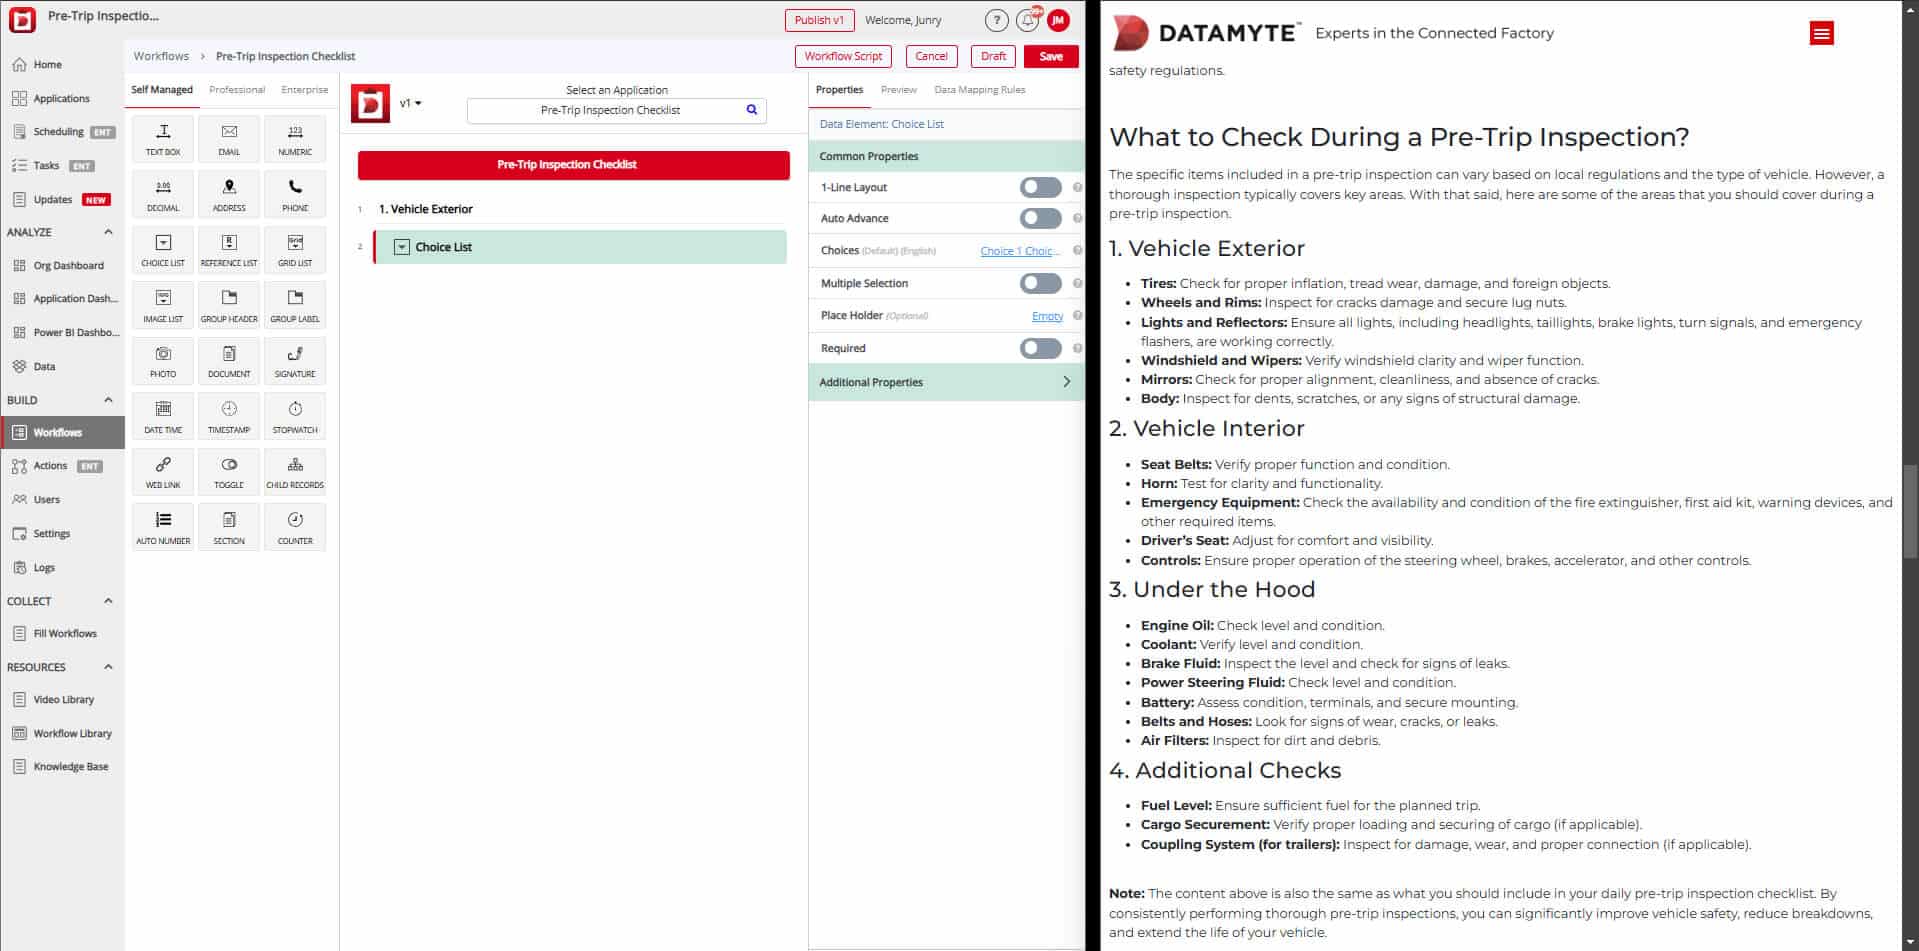
STEP 6 – Add Choice List Data Elements
- Drag and drop the Choice List Data Elements onto the workflow canvas.
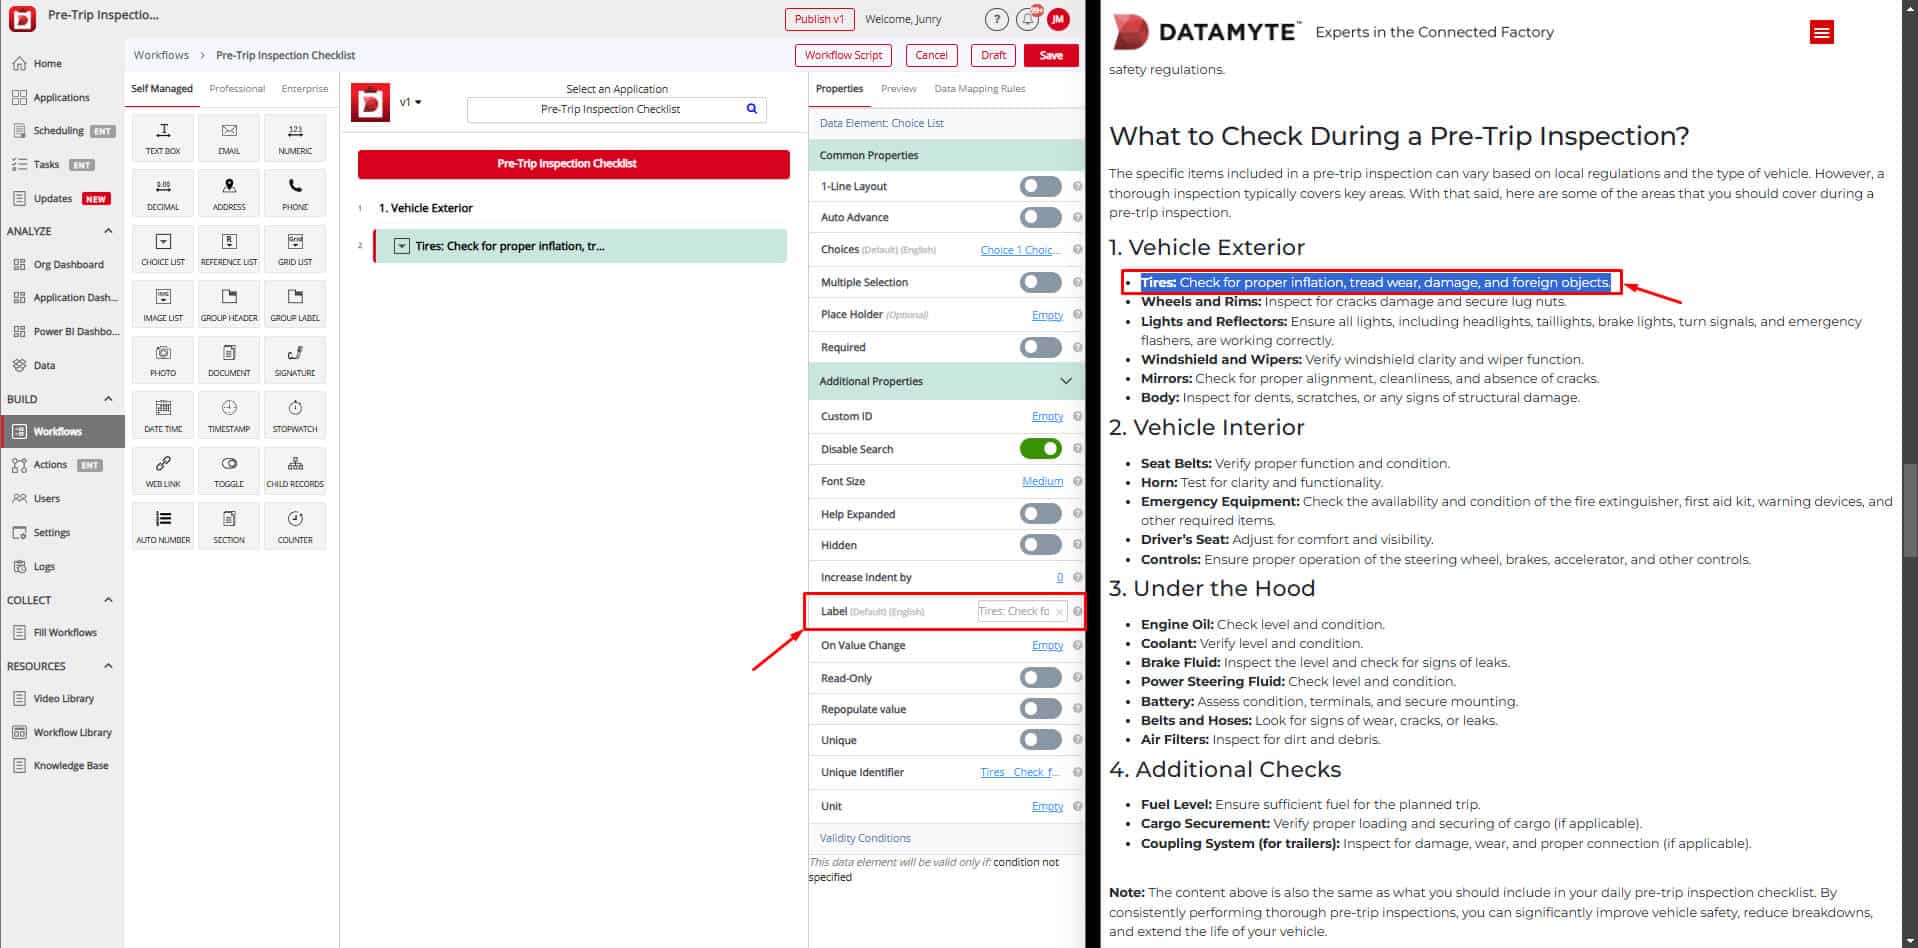
STEP 6.1 – Update Choice List Label
- Select the Choice List and go to Additional Properties.
- Update the Label using the relevant data from the checklist.
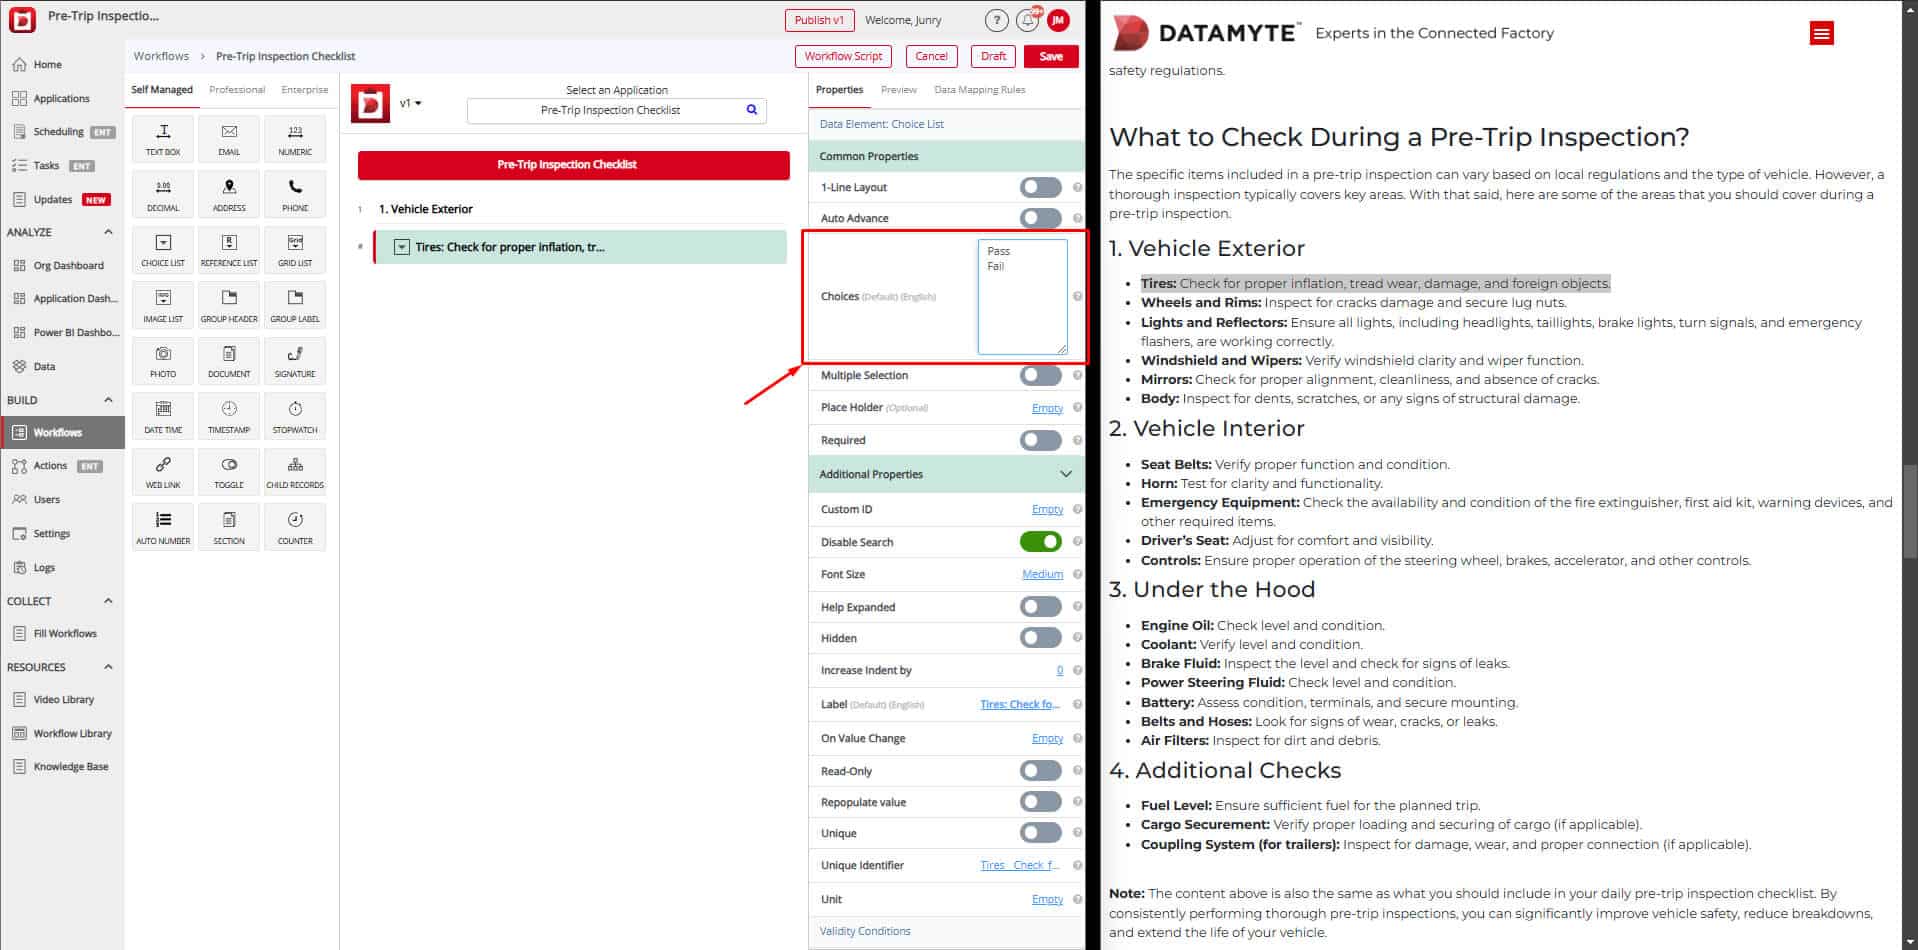
STEP 6.2 – Adjust Choice Options
- Change the default choices to Pass and Fail within the Common Properties panel.
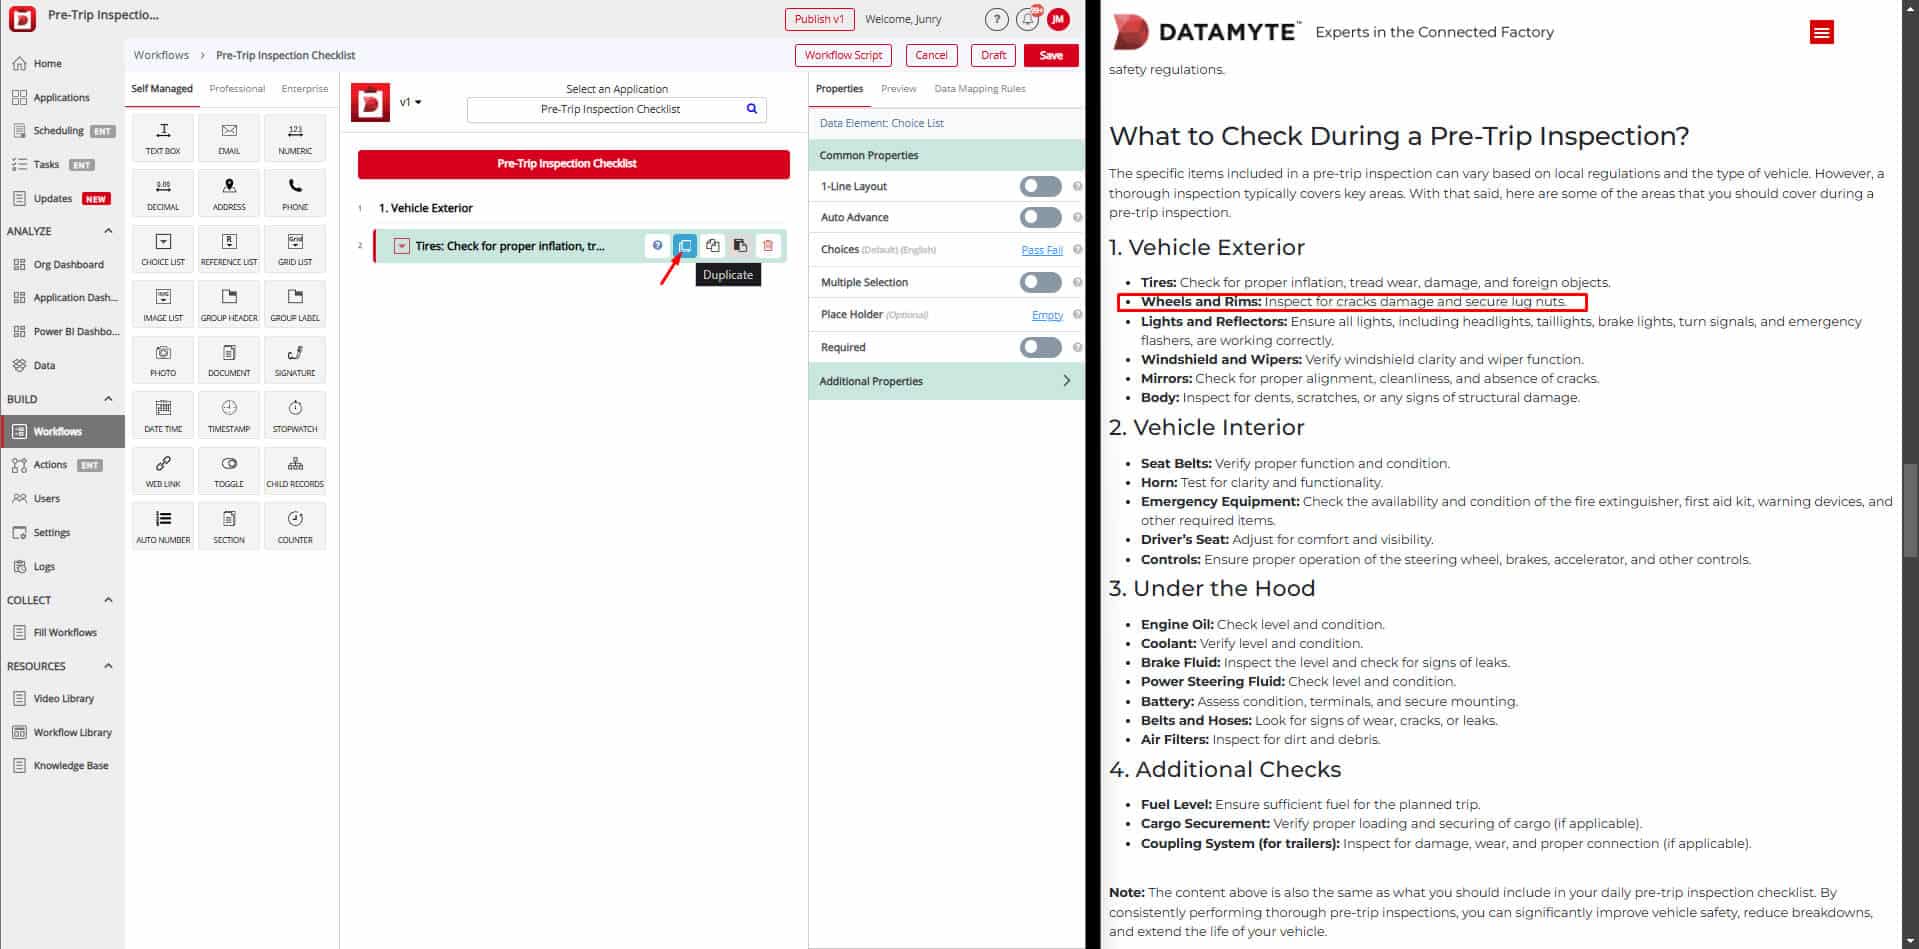
STEP 7 – Duplicate Choice List for Additional Items
- Right-click on the existing Choice List Data Element and select Duplicate.
- Position the duplicated item as needed.
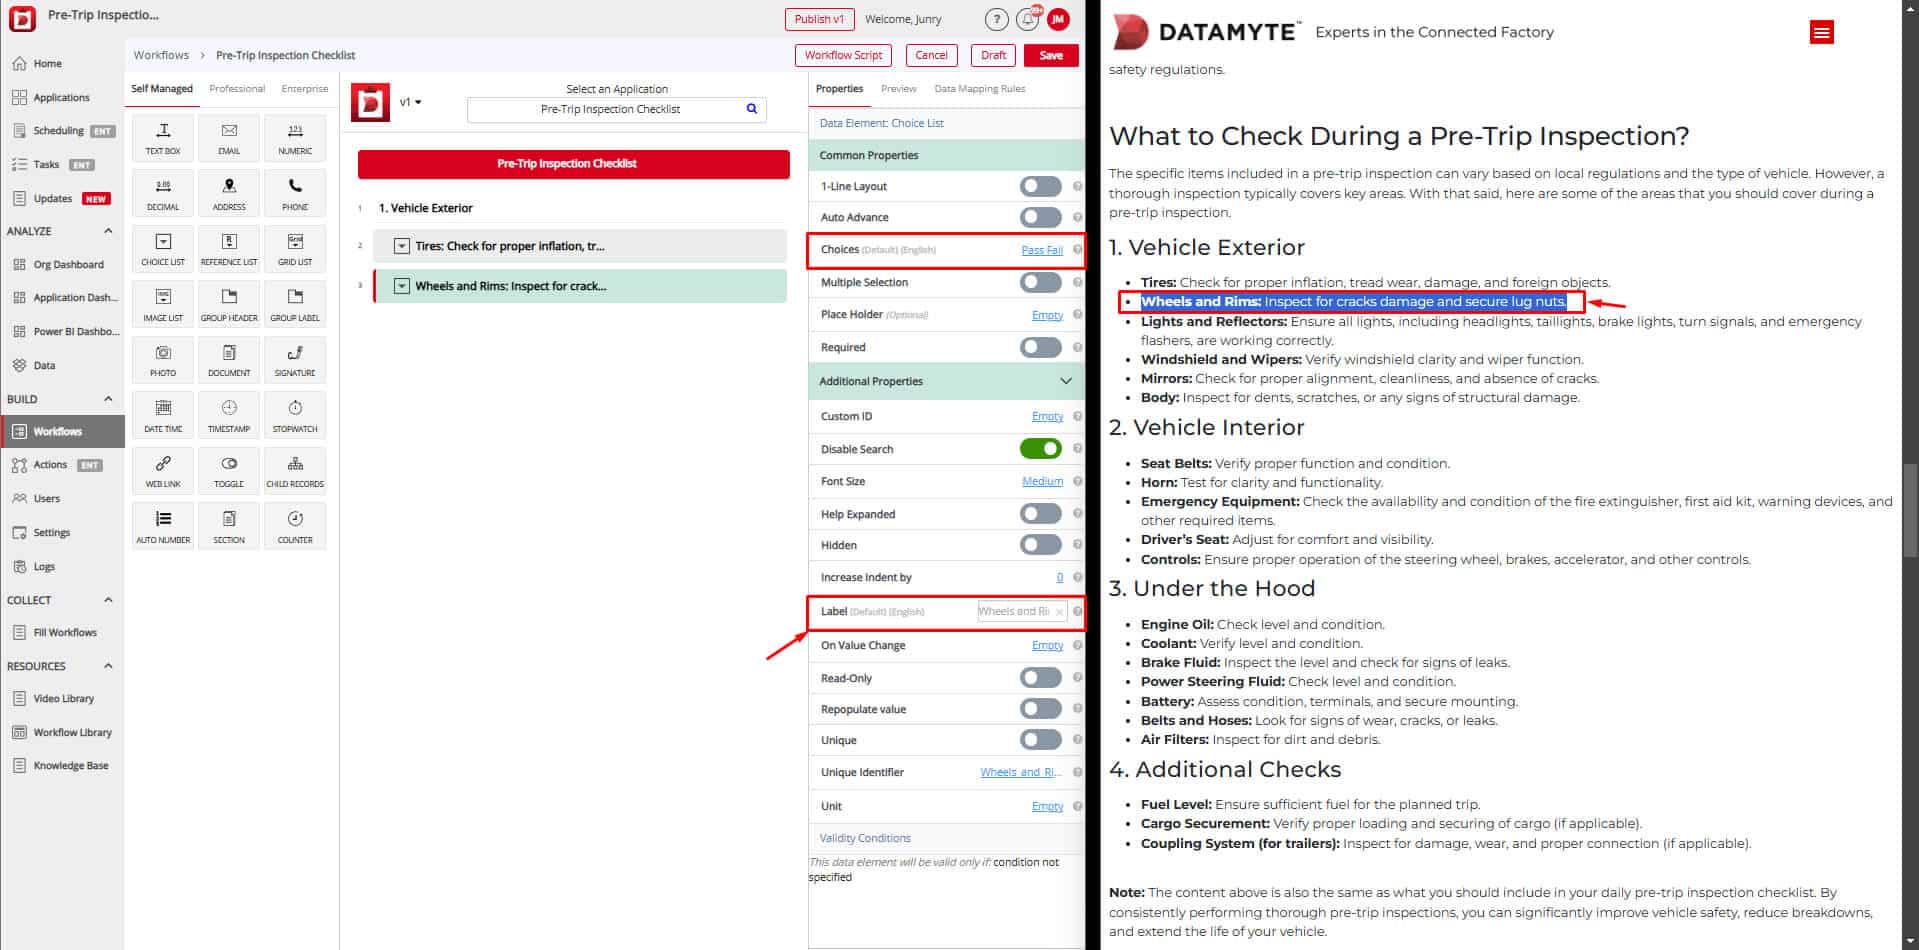
STEP 7.1 – Update Duplicated Choice List
- Adjust the Label and other properties to match the corresponding checklist item.
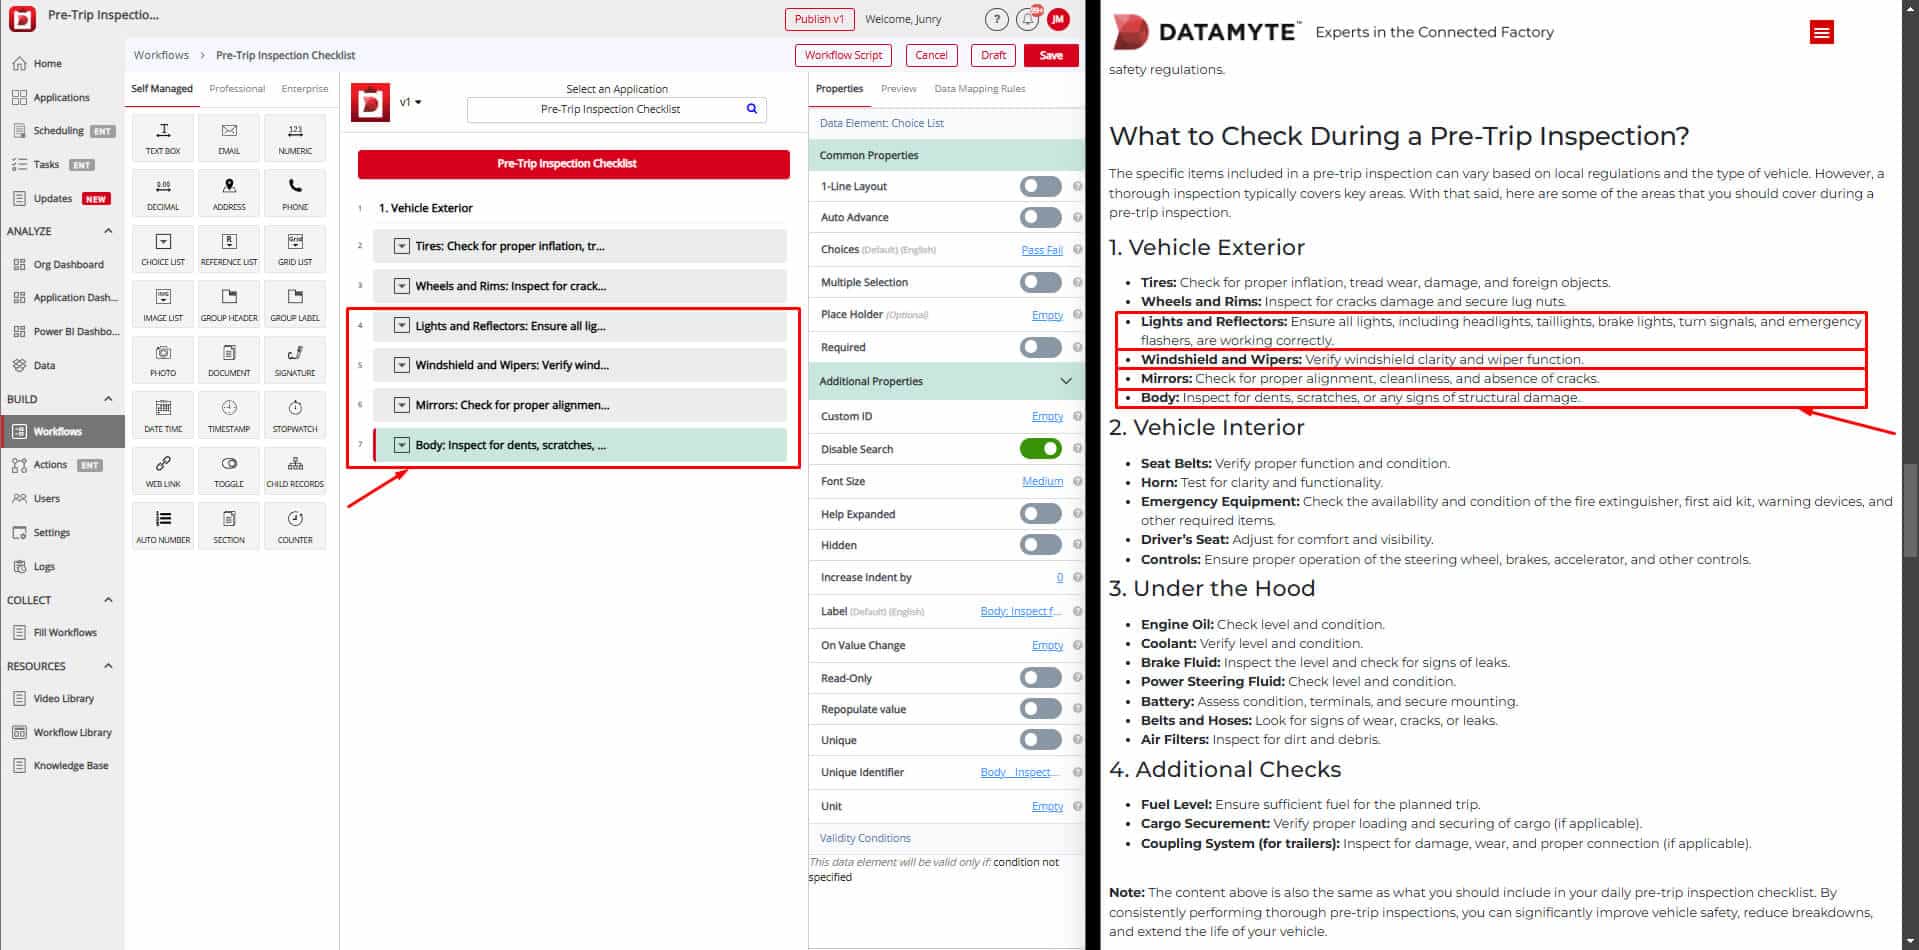
STEP 7.2 – Continue for Remaining Items
- For the remaining 4 items, follow Step 7 and Step 7.1 for each item.
- Ensure labels and properties are updated as per the checklist.
STEP 8 – Add Additional Headers
- For the next header, follow Step 5 and Step 5.1.
- Update the Header Title according to the checklist.
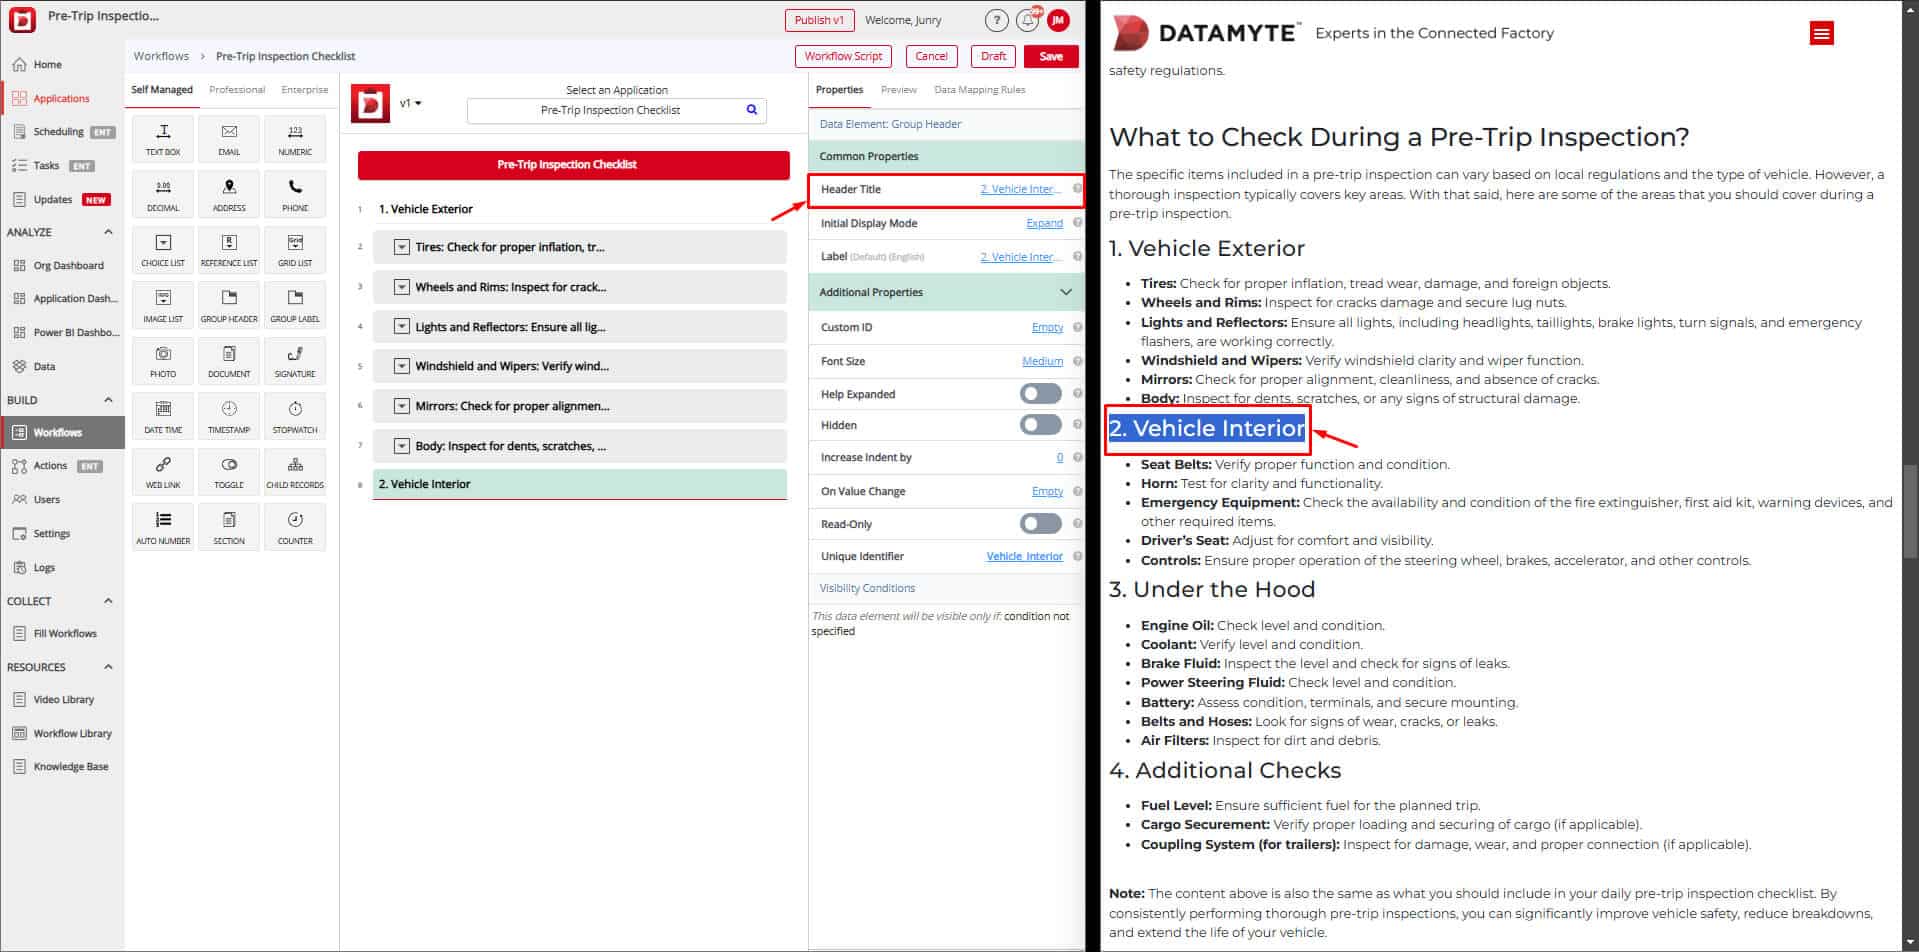
STEP 9 – Complete Remaining Items
- Repeat Steps 5 to 7.2 for all remaining checklist items.
- Verify each label and property using the guide.
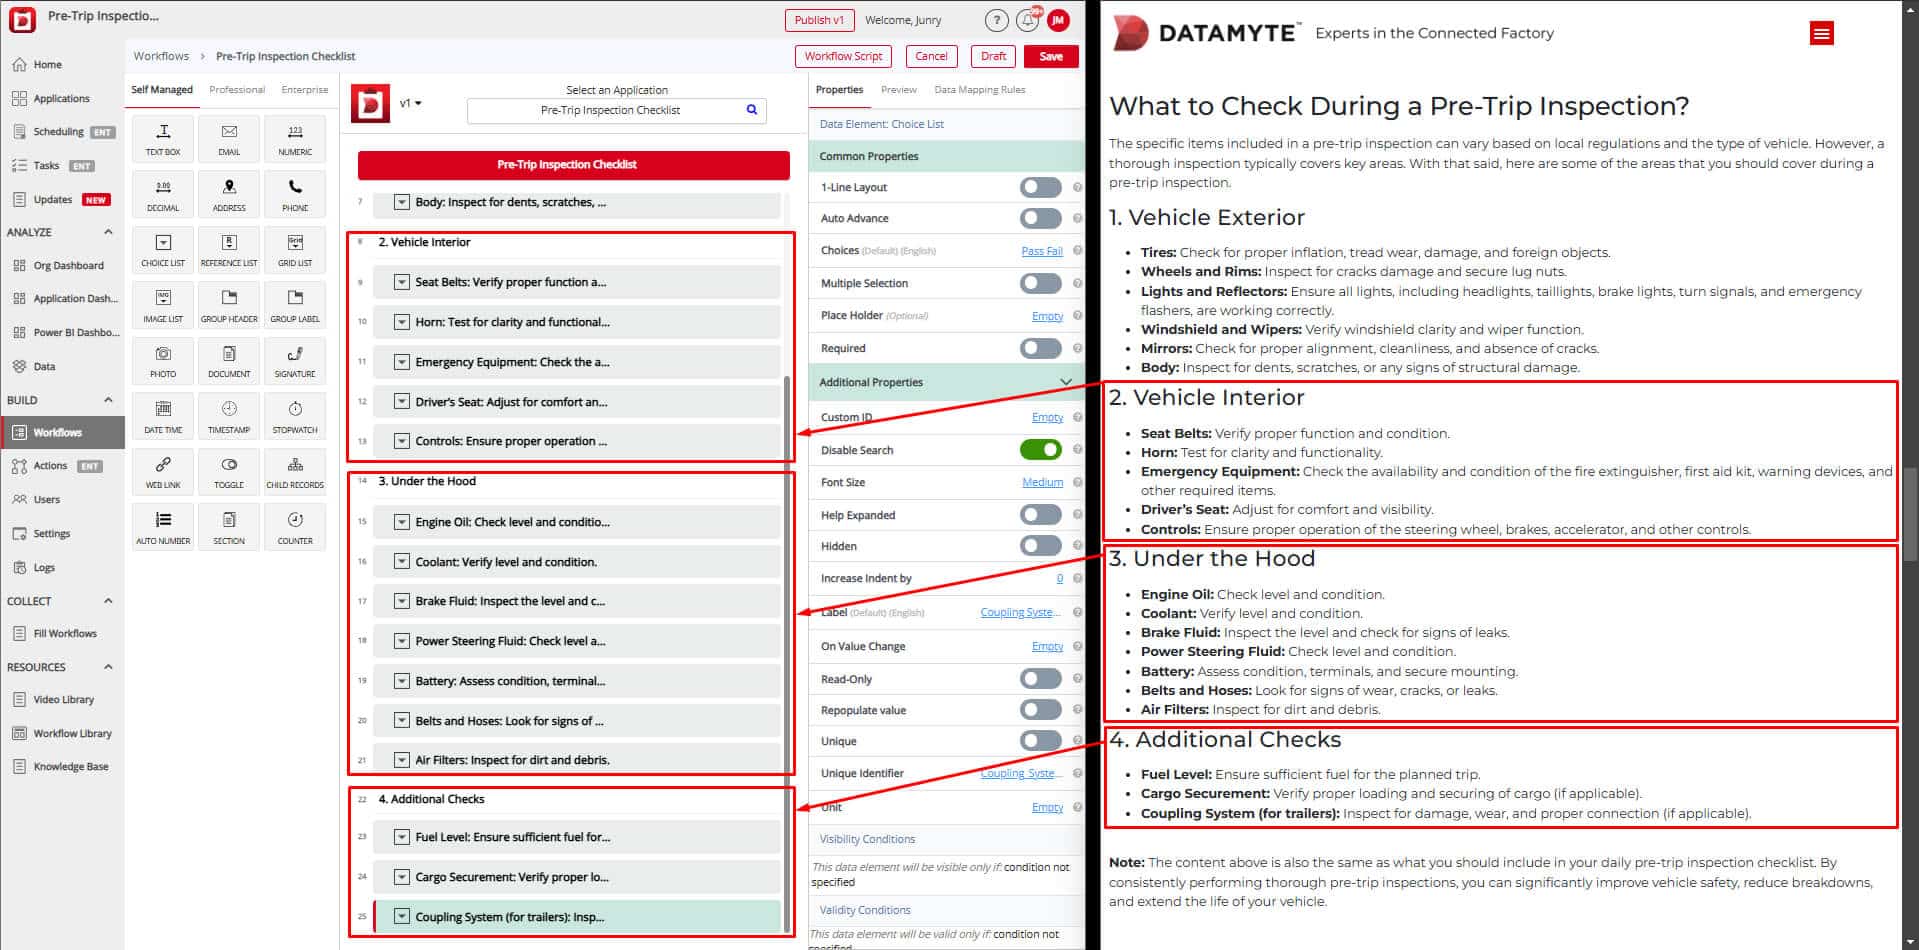
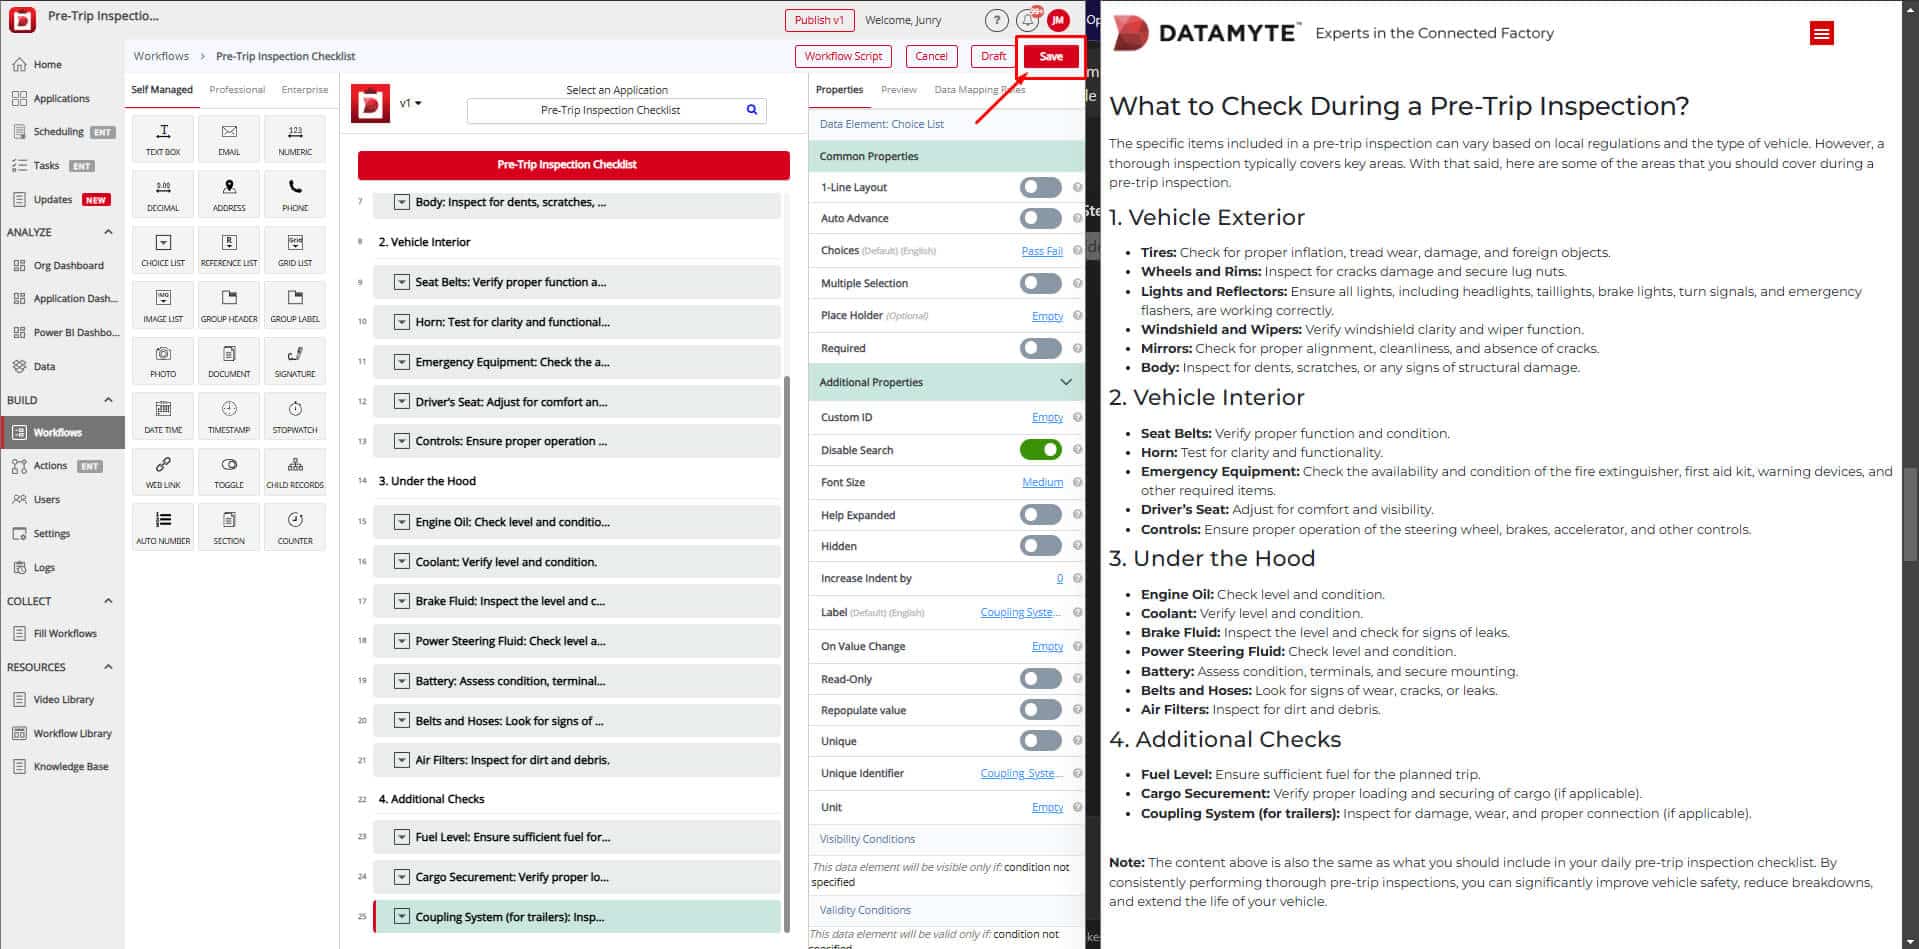
STEP 10 – Save Workflow
- Click the Save button to store your progress and ensure changes are applied.
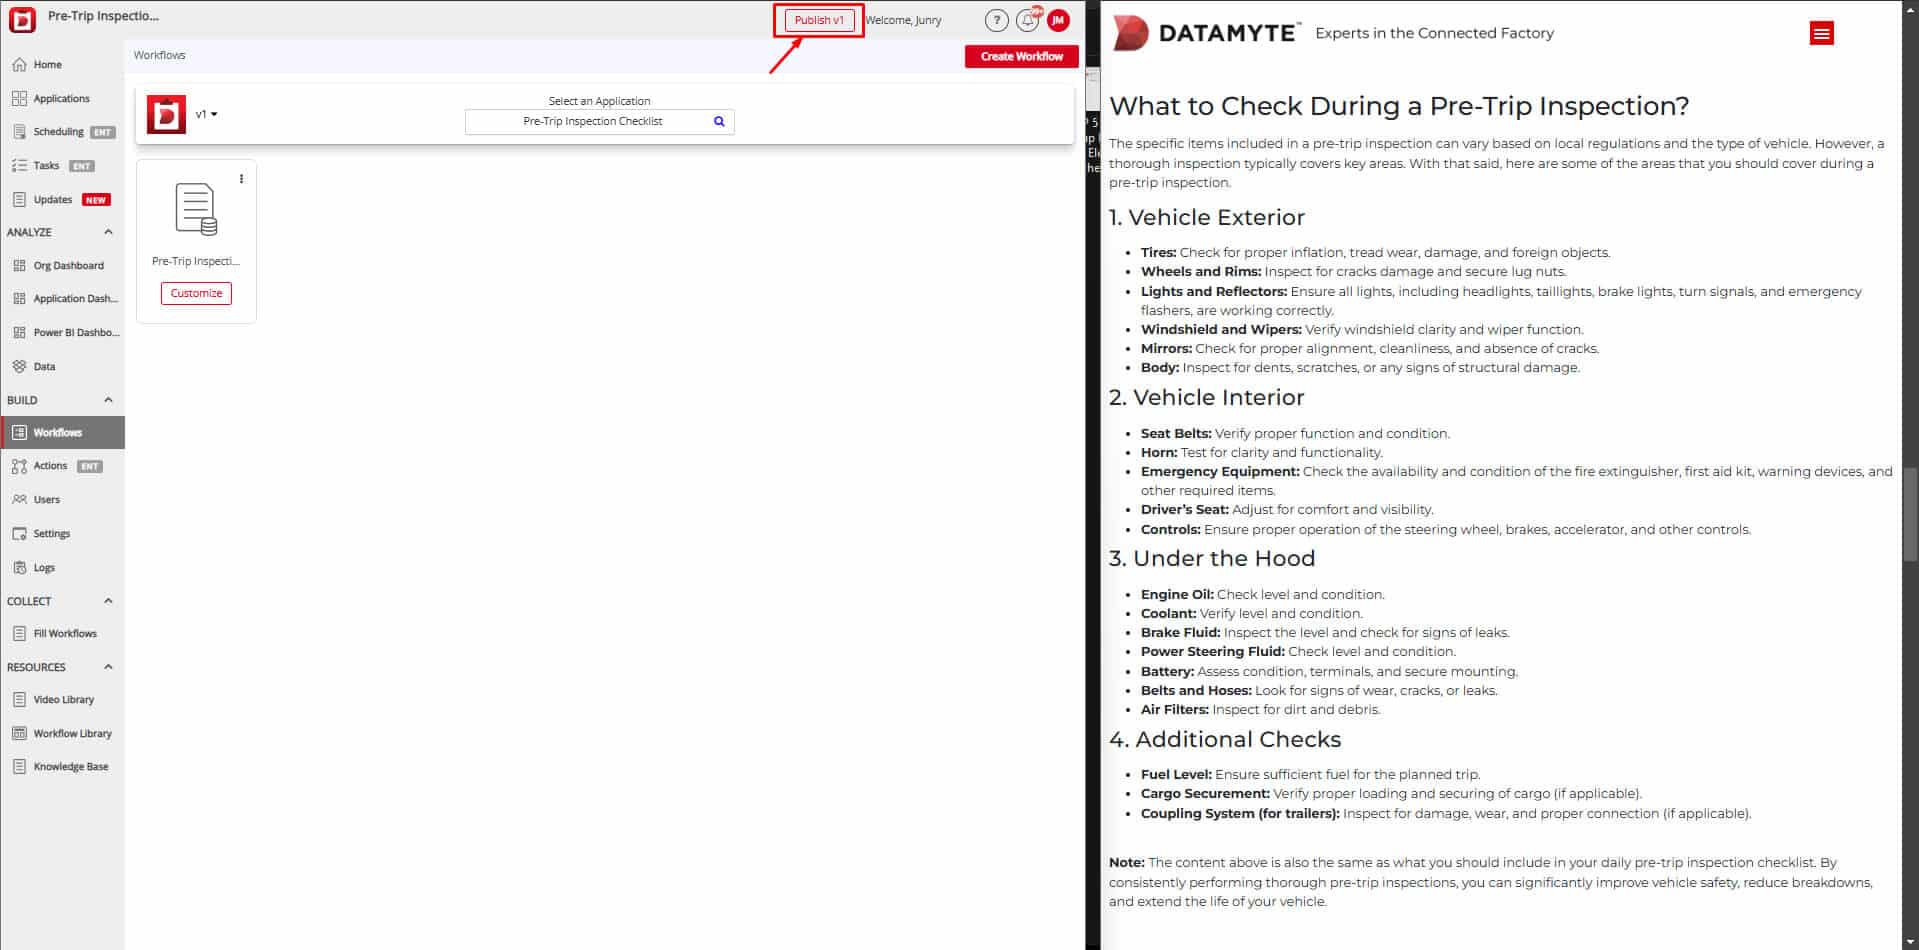
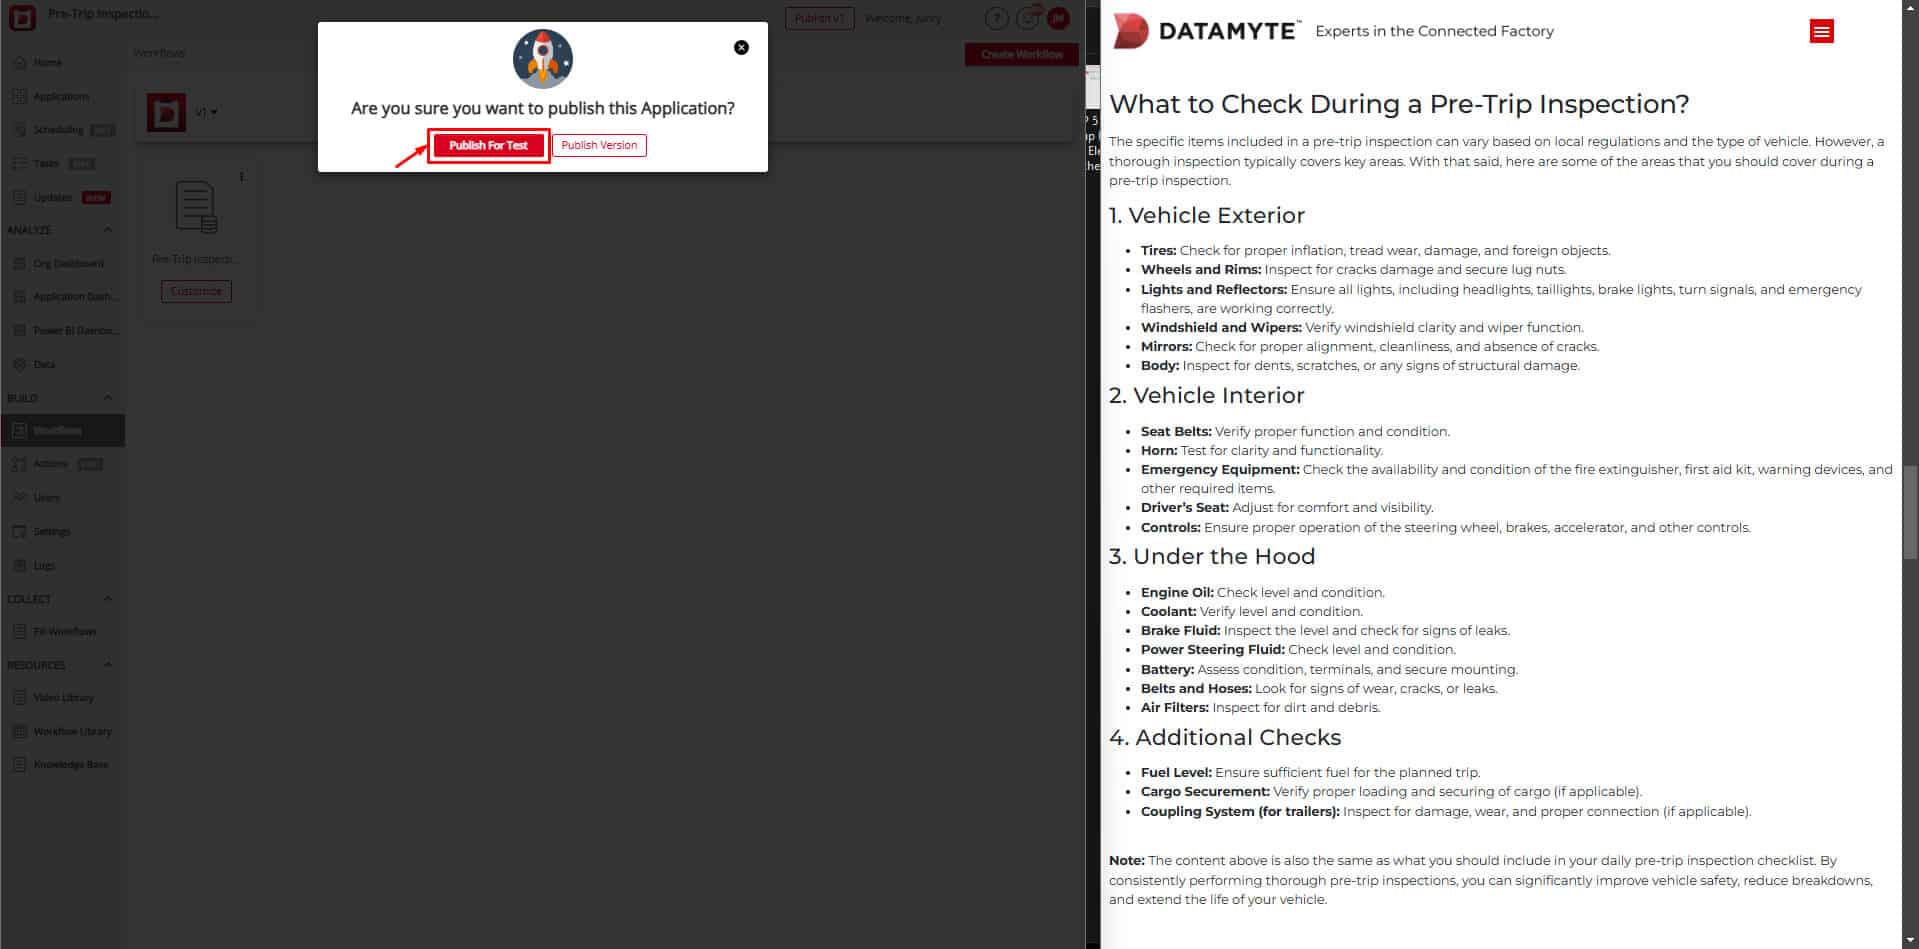
STEP 11 – Publish Application
- Click on Publish V1 to create the first version of your application.
- Select Publish for Test to prepare it for the testing phase.
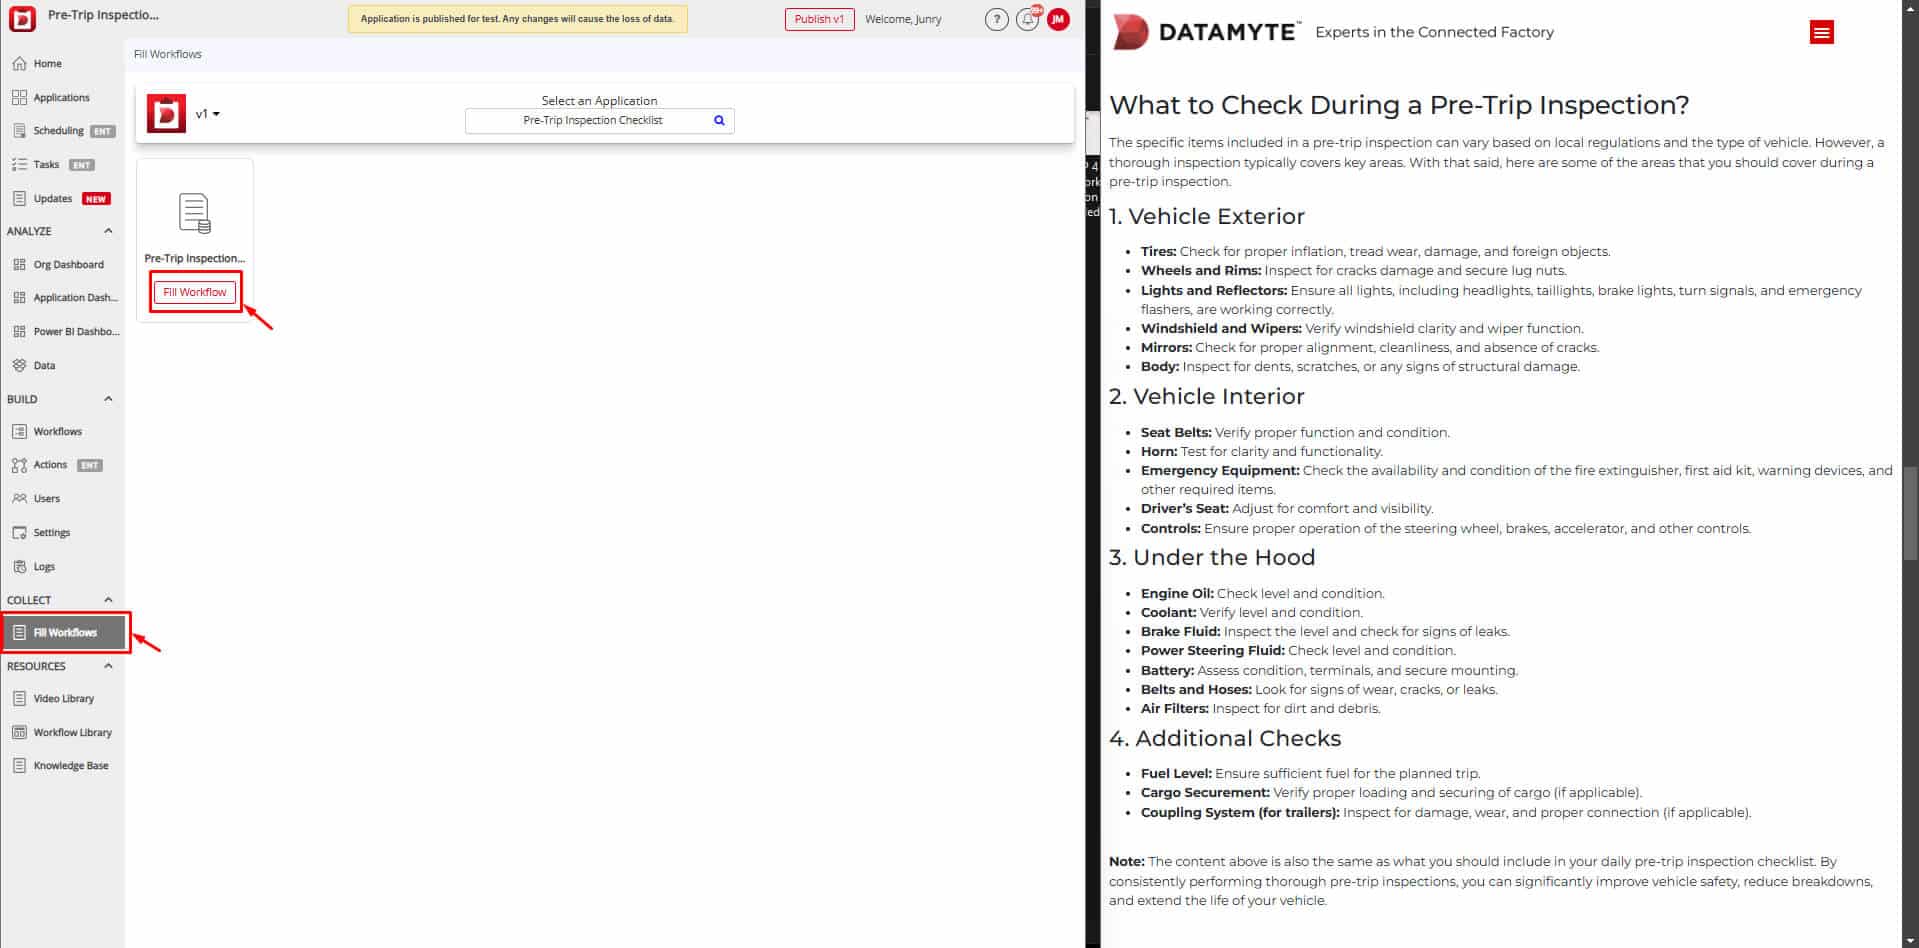
STEP 12 – Check Workflow Completion
- Navigate to the Fill Workflows option.
- Ensure that all workflows are completed and all required fields are correctly filled.
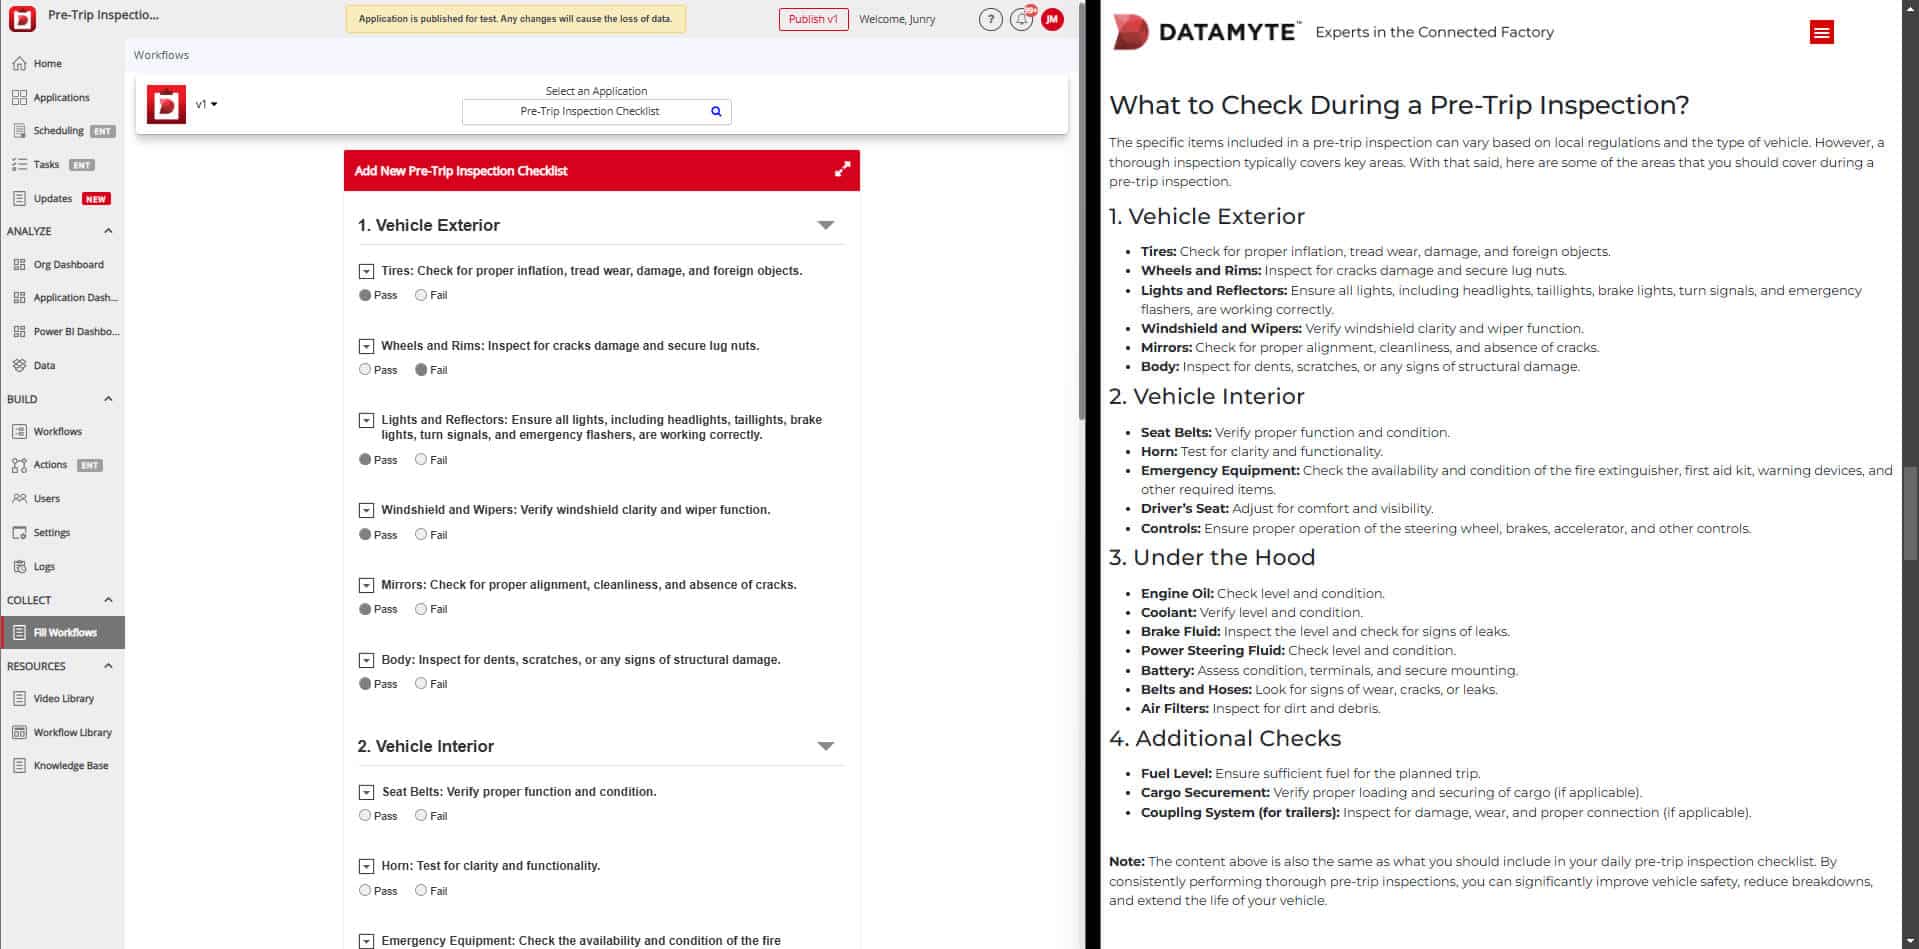
STEP 13 – Application Creation Completed
- Your application is now ready for testing and further evaluation.
- Collaborate with team members to gather feedback and make improvements as necessary.
Creating and implementing a daily pre-trip inspection checklist allows you to conveniently monitor your truck fleets and ensure daily pre-trip inspections are completed. This can proactively reduce risks and prevent disruptions to fleet operations.
Frequently Asked Questions (FAQs)
Q1: How often should a daily pre-trip inspection be conducted?
A daily pre-trip inspection should be performed before a commercial vehicle is operated every day. This is a mandatory requirement to ensure road safety.
Q2: What is the ideal time allocation for a thorough pre-trip inspection?
While the time can vary based on the vehicle’s size and complexity, a general guideline is to allocate at least 30 minutes for a comprehensive inspection. However, it’s essential to prioritize thoroughness over speed.
Q3: Can I use a pre-trip inspection checklist template?
Absolutely. Using a pre-trip inspection checklist template is highly recommended. It helps ensure consistency and reduces the chances of missing critical items during the inspection. Many templates are available online for free.
Q4: What should I do if I find a problem during the pre-trip inspection?
If you discover any issues during the inspection, you should immediately report them to your supervisor or fleet manager. The vehicle should not be operated until the problem is resolved. Complete a Driver Vehicle Inspection Report (DVIR) to document the issue.
Q5: How detailed should the documentation be for a pre-trip inspection?
Documentation should be clear, concise, and accurate. It should include the date, time, vehicle identification number, driver’s name, and a detailed list of any defects or deficiencies found during the inspection.
Q6: What are the potential consequences of skipping a pre-trip inspection?
Skipping a pre-trip inspection can lead to serious consequences, including accidents, vehicle breakdowns, and legal penalties. It also puts the driver, other road users, and the company’s reputation at risk.
Conclusion
A daily pre-trip inspection is a critical component of safe and efficient fleet operations. By conducting thorough inspections, you can significantly reduce the risk of accidents, breakdowns, and costly repairs.
This article has outlined the importance of pre-trip inspections, the key components to check, and the potential consequences of skipping this crucial step.
Our goal was to provide you with essential information to create a comprehensive pre-trip inspection checklist and to emphasize the importance of making it a daily habit. By implementing a robust pre-trip inspection program, you can improve safety, reduce costs, and enhance overall fleet performance.
We encourage you to create a pre-trip inspection checklist template to get started. By making pre-trip inspections a non-negotiable part of your daily operations, you’re taking a proactive step toward a safer and more efficient fleet.
Streamline Pre-Trip Inspections with DATAMYTE
DATAMYTE is a quality management platform with low-code capabilities. Our Digital Clipboard, in particular, is a low-code workflow automation software that features a workflow, checklist, and smart form builder. This tool lets you create a digital daily pre-trip inspection checklist, ensuring all necessary checks are systematically documented and performed efficiently.
DATAMYTE also lets you conduct layered process audits (LPA), a high-frequency evaluation of critical process steps, focusing on areas with the highest failure risk or non-compliance. Conducting LPA with DATAMYTE lets you effectively identify and correct potential defects before they become major quality issues.
With DATAMYTE, you have an all-in-one solution for optimizing and simplifying the pre-trip inspection process, ensuring compliance and safety standards are consistently met. Book a demo now to learn more.

