Whenever raw materials enter a production process, incoming inspection is the key to catching potential quality issues early on. That makes an incoming inspection checklist one of the most powerful tools for identifying and resolving these problems immediately.
It makes a lot of sense to learn what this type of checklist is about and why you should consider creating one for your manufacturing business. This guide will provide an overview of incoming inspection checklists, specifically what they are, why they’re important, how to create one, and how to use them to keep your incoming materials defect-free.
What is an Incoming Inspection?
An incoming inspection, also known as a receiving inspection or material inspection, is critical to ensuring the quality of a product. It involves a thorough examination of incoming materials, components, or finished goods against predetermined specifications and acceptance criteria.

This inspection typically takes place at the receiving dock or a designated inspection area within the manufacturing facility. The primary objective of an incoming inspection is to identify and address any potential quality issues with the received items before they enter the production process.
By catching problems early, manufacturers can prevent defective products from being produced, saving time and resources and minimizing rework costs. Incoming inspections often utilize a standardized tagging system to categorize the received items.
This system might include tags for items that are:
- Accepted: These items meet all specifications and are fit for production use.
- Conditionally Accepted: These items have minor deviations from specifications that may not affect functionality but require documentation or further review.
- Rejected: These items have significant defects or deviations that render them unusable and require corrective action from the supplier.
What is an Incoming Inspection Checklist?
An incoming inspection checklist serves as a comprehensive guide for quality assurance (QA) personnel during the receiving process. It outlines the specific steps and criteria to be followed when evaluating incoming materials, components, or finished goods. This ensures a consistent and efficient inspection, minimizing the risk of errors and omissions.
What’s Included in an Incoming Inspection Checklist?
The checklist typically includes the following key elements:
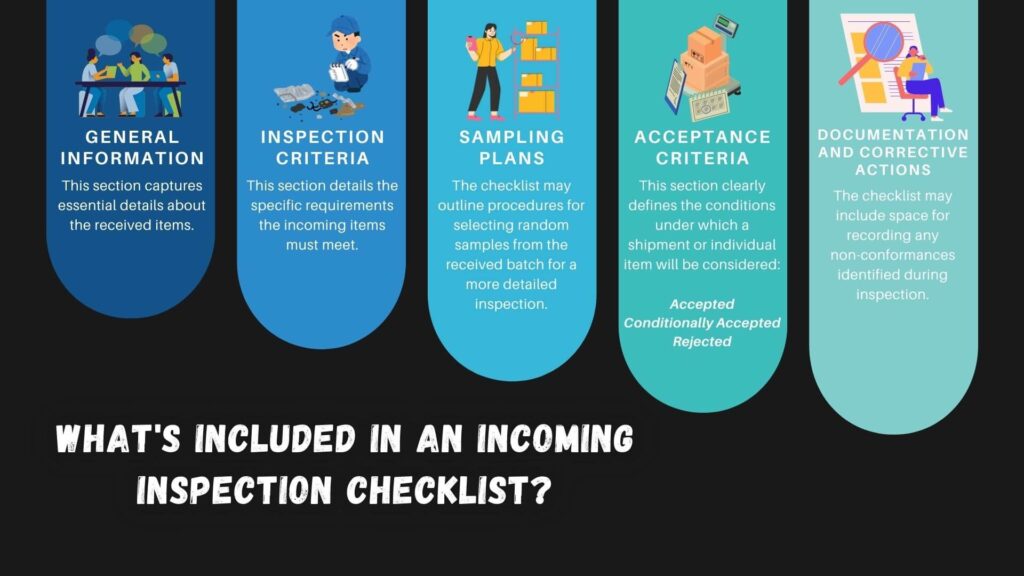
General Information
This section captures essential details about the received items, such as:
- Date of inspection
- Inspector name
- Purchase order (PO) number
- Supplier information (name, address)
- Material/product description
Inspection Criteria
This section details the specific requirements the incoming items must meet. This may involve:
- Dimensional verification: Checking measurements against technical drawings or specifications.
- Visual inspection: Examining for defects like scratches, dents, discoloration, or missing parts.
- Functional testing: Evaluating the item’s performance according to established procedures.
- Documentation review: Verifying packing slips, invoices, and certificates against the PO for accuracy and completeness.
- Packaging and handling: Inspecting for damage, proper labeling, and secure packaging suitable for the material type.
Sampling Plans
The checklist may outline procedures for selecting random samples from the received batch for a more detailed inspection. This helps ensure a representative assessment of the entire shipment.
Acceptance Criteria
This section clearly defines the conditions under which a shipment or individual item will be considered:
- Accepted: Meets all specifications and is fit for production use.
- Conditionally Accepted: Has minor deviations that do not affect functionality but require documentation or further review.
- Rejected: Has significant defects that render it unusable and necessitate corrective action from the supplier.
Documentation and Corrective Actions
The checklist may include space for recording any non-conformances identified during inspection. This documentation should specify the type and severity of the defect, allowing for appropriate corrective actions to be taken.
Why Use Incoming Inspection Checklists?
Incoming inspection checklists offer a multitude of benefits for manufacturers, contributing to improved quality control, cost savings, and overall production efficiency. Here’s a closer look at some key advantages:
- Ensured Quality and Consistency: Checklists guarantee a standardized inspection process, ensuring all incoming materials or products are evaluated against the same criteria. This consistency minimizes the risk of human error and helps maintain consistent product quality throughout production runs.
- Reduced Production Costs: Catching quality issues early in the receiving process prevents defective materials from entering production. This reduces the need for rework, scrappage, and potential product recalls, ultimately saving time and money.
- Improved Customer Satisfaction: By ensuring high-quality materials are used in production, manufacturers can deliver finished products that meet or exceed customer expectations, leading to higher customer satisfaction and loyalty.
- Enhanced Supplier Management: Inspection data obtained through checklists can be used to track supplier performance. By identifying suppliers with consistent quality or recurring issues, manufacturers can take corrective actions such as implementing stricter quality control measures or seeking alternative suppliers.
- Streamlined Documentation: Checklists facilitate the recording of inspection results and any identified non-conformances. This creates a clear paper trail for future reference and simplifies communication with suppliers if necessary.
- Increased Efficiency: Checklists guide inspectors through a well-defined process, saving time and minimizing the need for extensive training. Additionally, digital checklists can further enhance efficiency by allowing for faster data entry, reporting, and analysis.
By implementing incoming inspection checklists, manufacturers gain a powerful tool for maintaining consistent quality, optimizing production processes, and ensuring the delivery of high-quality products that meet customer demands.
A Closer Look at Incoming Inspection Identification Tagging System
An effective incoming inspection process often utilizes a standardized identification tagging system. This system assigns clear tags to categorize received materials based on their conformance to acceptance criteria outlined in the purchase order (PO). These tags communicate the inspection results and guide subsequent actions.
1. Accepted
Materials with this tag meet all specifications and are deemed suitable for production use. They are typically placed in designated storage areas or forwarded to the next production stage. Once all materials for a production run are accepted, manufacturers may proceed with a First Article Inspection (FAI) to verify that the initial production output aligns with design requirements.
2. Conditionally Accepted
This tag signifies that materials have minor deviations from specifications. These deviations might include:
- Functional or dimensional discrepancies
- Shipping damage
- Improper labeling
Quality inspectors need to assess the severity of these issues to determine if the materials can be conditionally accepted. Here’s what this might involve:
- Defining Acceptance Conditions: Specify any rework required to bring the materials up to standard. This could involve repairs by the manufacturer or replacements from the supplier.
- Approval Process: Obtain documented sign-off from the quality manager and a supplier representative, acknowledging the agreed-upon conditions for acceptance.
3. Rejected
Materials with this tag have significant defects that render them unusable in production. These defects may involve safety hazards or non-compliance with regulations. Quality inspectors typically issue a Non-Conformance Report (NCR) for rejected materials. The NCR should detail:
- The nature and severity of the defects
- The disposition of the materials (scrapped, sorted, or re-evaluated against more relaxed criteria)
While rejecting materials can lead to production delays and potential shortages, it’s a crucial step to prevent costly consequences. These consequences include:
- Manufacturing defective or unsafe products
- Production line stoppages due to unusable materials
- Potential product recalls
By implementing a clear identification tagging system, manufacturers can ensure efficient communication and take appropriate actions based on the inspection results. This system ultimately contributes to maintaining quality standards and preventing disruptions in the production process.
How to Create An Incoming Inspection Checklist?

An incoming inspection checklist should include all the key points to consider when incoming materials and components are inspected. Here’s how to create an incoming inspection checklist:
- Research the incoming materials and components for any applicable standards and regulations.
- Identify the incoming materials and components to be inspected.
- Determine the required standards for incoming materials and components.
- Create a checklist of incoming materials and components to be inspected.
- Establish an inspection process for incoming materials and components.
- Set acceptance and rejection criteria for incoming materials and components.
- Establish a sampling plan to ensure incoming materials and components are inspected adequately.
- Document incoming materials and components inspection results.
Frequently Asked Questions (FAQs)
Q1: How much detail should be included in my incoming inspection checklist?
The level of detail will depend on the complexity of the materials you’re receiving. For simple items, a basic checklist with dimensional checks and visual inspections might suffice.
However, for complex components or materials with critical safety specifications, the checklist should be more comprehensive, including functional testing, material certifications, and specific acceptance criteria for minor defects.
Q2: Can I use a generic incoming inspection checklist for all materials?
It’s best to tailor your checklist to the specific material or product being inspected. Generic checklists might miss crucial details specific to certain items.
However, you can develop a template with common elements like document verification and packaging inspection, then customize it for each material by adding relevant inspection criteria.
Q3: How often should I update my incoming inspection checklist?
It’s recommended to review and update your checklists periodically. This is particularly important if:
- You change suppliers
- Product specifications are modified
- New regulations or industry standards are implemented.
- You experience recurring issues with specific materials.
Q4: What are some best practices for using digital incoming inspection checklists?
- Pre-populate information: Before inspections begin, populate the checklist with details like the PO number, supplier information, and material description.
- Utilize dropdown menus and checklists: These features can improve data entry speed and accuracy for inspectors.
- Enable photo capture: Allow inspectors to capture images of defects or non-conformances for better documentation.
- Integrate with other systems: Consider integrating your checklist with your quality management system or inventory management software for seamless data flow.
Q5: How can I ensure inspectors are following the checklist consistently?
- Provide training: Train inspectors on the proper use of the checklist, including understanding acceptance criteria and proper documentation procedures.
- Perform audits: Conduct periodic audits to verify inspectors are following the checklist and identify any areas for improvement.
- Encourage feedback: Encourage inspectors to provide feedback on the checklist’s clarity and usability.
Q6: What are some additional considerations for implementing an incoming inspection program?
- Define clear roles and responsibilities: Establish who is responsible for conducting inspections, reviewing results, and taking corrective actions.
- Allocate adequate resources: Ensure there’s sufficient time and manpower dedicated to thorough inspections.
- Communicate effectively: Clearly communicate inspection procedures and expectations to all relevant personnel, including suppliers and production teams.
Conclusion
An incoming inspection checklist is a powerful tool that empowers quality assurance personnel to ensure consistent product quality and prevent costly production problems. This article has guided you through the key elements of an effective incoming inspection checklist, from understanding its purpose and benefits to creating a customized checklist and implementing a tagging system for clear communication.
By following the steps and best practices outlined here, you can establish a robust incoming inspection program that safeguards your production process and ultimately contributes to the delivery of high-quality products.
This blog post aims to equip you with the knowledge and resources necessary to develop and implement an effective incoming inspection checklist program. We encourage you to:
- Review your current inspection procedures: Identify areas for improvement and consider how an incoming inspection checklist can benefit your quality control processes.
- Develop or customize your checklist: Tailor the checklist to your specific needs and ensure it covers all critical inspection points for your incoming materials.
- Train your inspectors: Provide training on the proper use of the checklist and ensure everyone understands the acceptance criteria and documentation procedures.
By taking these steps, you can leverage the power of incoming inspection checklists to achieve higher quality standards and streamline your production process.
Streamline Incoming Inspections with DATAMYTE
DATAMYTE is a quality management platform with low-code capabilities. Our Digital Clipboard, in particular, is a low-code workflow automation software that features a workflow, checklist, and smart form builder. This tool lets you create and customize digital incoming inspection checklists that are easy to use on any mobile device.
DATAMYTE also lets you conduct layered process audits (LPA), a high-frequency evaluation of critical process steps, focusing on areas with the highest failure risk or non-compliance. Conducting LPA with DATAMYTE lets you effectively identify and correct potential defects before they become major quality issues.
With DATAMYTE, you have an all-in-one solution for streamlining and optimizing your entire incoming inspection process. Book a demo now to learn more about how DATAMYTE can empower your quality assurance team and elevate your product quality.